Bird from natural material. Master class from natural materials “Fairytale bird. bottle birds
Larisa Stupina
Master class "Birds made of natural material"
Stupina Larisa Viktorovna
Master class "Birds made of natural material"
Cedar, pine, spruce cones in themselves are already real art objects created by nature. This is an amazing and free material for creativity. We get inspired and go to the forest, and then with pleasure we make unusual crafts and decorations with the children.
Purpose: interior decoration, gift.
Target: making crafts from natural materials.
Tasks:
Teach, use natural materials;
Develop fine motor skills;
Develop creativity, imagination, fantasy;
Cultivate perseverance, patience, accuracy in work.
Materials and tools:
Pine cones,
large and small beads
cardboard, corrugated board,
toothpicks,
chenille wire,
glue gun,
Take a wooden bead - this will be the head of our bird.
Select a pinecone and use a hot glue gun to glue the head to the flat side of the pinecone.
From toothpicks or chenille wire, we will make a beak and paws for a bird and glue them.
We make a stand.
Cut out a circle from thick cardboard and glue it with a strip of corrugated cardboard.
Let's take our bird and glue it to the stand.

From feathers we will make wings and a tail, and glue them between the scales of the cone.
With the help of additional materials, we will decorate our bird.

Birds from cones original gift
and interior decoration.
Related publications:
This year, the Defender of the Fatherland holiday was surprisingly long. Three more free days good time to pay attention.
Persimmon is the fruit of a tree belonging to the ebony family. The persimmon fruit is large in size, juicy, has a sweet taste, its skin is bright.
Whenever the holidays are approaching, parents start to have a headache about gifts for teachers and educators. I'm not an exception.
Autumn has a beautiful smile, In her woman's kindest face, And in her, embroidered with gold, Happiness sparkles - joyfully, easily. Leaves fall like silk.
Master class mosaic from natural material "Castle" Master class on the topic: Collective mosaic from wooden beads "Castle" Prepared by:.
Purpose: To teach children to design crafts with their own hands. Preliminary work: Collect pumpkin seeds in autumn. Showing a presentation on the topic "Primroses" ;.
I suggest you make beautiful bas-reliefs, which, if desired, can be made with magnets. For the manufacture of bas-reliefs, we need.
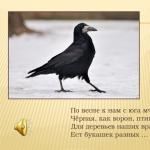
Birds have always attracted the eyes of others and many are attracted by their ability to fly. Their diversity is simply amazing. For example, swans or storks fascinate with their size and beauty, woodpecker and jay - with their unusual appearance, owl and crow - with severity, and magpies - with restlessness. Each has its own taste and character! And how many birds that are not visible, but their sonorous singing is heard over long distances.
It is not surprising that many needlewomen love to depict birds using different techniques. Today we will consider several options for making feathered friends from different materials.
From sand.
On the grass of the lawn, you can make a beautiful composition of colored sand. A white dove, with delicate daisies along the contour, looks great on a blue heart.
From the leaves of irises.
This magnificent weaving of green iris leaves looks unusual. A long tail gives the bird an extra charm.

From mounting foam.
Mounting foam is applied on the basis of hardboard, cut in the shape of a stork. It is easily painted with enamel and retains the beauty of appearance for a long time.

From plastic bottles.
Plastic containers are a fertile material for crafts. You can cut any shape and paint in all sorts of shades. Here is such a bright cockerel obtained from just a few bottles.

From feathers.
If you carefully collect the feathers, then you can make a great craft that looks just natural. The frame for the birds is made of plaster, which is pasted over with real feathers.

From paper.
Plain office white paper can come in handy for. You just need to circle the child’s palm, cut out a lot of such blanks and glue them onto a three-dimensional base. Another dove of peace looks magnificent and majestic.

From disposable devices.
And this soaring dove is made from disposable tableware. The frame is formed from a metal mesh, on which feathers from disposable spoons and forks are fixed. Original and unusual.

From a milk bottle.
For this little bird, you need to take white bottles that sell dairy products. Cut out all parts of the body and fasten them with universal glue. You don't even need to paint.

From fabric.
The splendor and texture of crafts can be achieved using synthetic winterizer and transparent fabric. Such a bird can be easily sewn by a craftswoman who knows how to work at a sewing machine.

From dry grass.
Someone cooks hay for cows and horses, and for needlewomen it is a fertile material for creativity. Such a bird, woven from herbs and ears of corn, looks not only unusual, but also somehow magical.

From foam.
Another fertile material that is easy to cut and holds its shape well. Styrofoam birds look realistic and do not need to spend extra money on their manufacture.


From flowers.
The main thing in this craft is a wire frame. And then you just fill it with flowers and you get such a mother hen with chickens made of thread.

From hay.
This big crane is made from dried grass and looks amazing. You need to tie a heap of hay with a thread and give it the shape of a bird. It is not often possible to see crafts in this technique.

Like these ones beautiful birds they can appear in your yard if you put a little effort into making them.
Taking care of the beauty of the apartment, its comfort and originality of style, every hostess tries to find something interesting for her interior. But it is not necessary to buy expensive figurines, it is better to do something with your own hands. For example, bird crafts. A variety of colored birds are sure to please young children.
What materials are suitable for crafts?
Now it is not difficult to find a self-study book and master your favorite handicraft technique. We will describe how to make a craft bird from various materials. What material to choose, judge for yourself. Birds made of thread or paper are small things that will come in handy in any home on a bookshelf. And large plastic cranes will decorate a piece of land near the facade of your summer house or private house.
In fact, handmade is now a very popular activity, which involves complete freedom of creativity. One has only to become interested, and creative impulses will immediately direct you along the path you need.
Bird crafts from plastic bottles
Now in many yards and kindergartens there are beautiful large crafts made from used plastic containers. This material is very wear-resistant and can be easily cut with simple scissors. With a little imagination, you can make a beautiful full-length swan, pheasant or colored peacock. Another advantage of plastic is that you can choose any color for your craft.
Creating a large swan is laborious. It will take a long time to cut out all the details from the bottles. And you also need a frame made of metal or wood, which cannot be done without the help of men. And, of course, you need a large supply of containers.
We propose to make a different bird - a little penguin. This is no less cute piece. A do-it-yourself bird, even of a small scale, made with pleasure, will stand right on the windowsill and delight the eye.
Such a cute penguin is done quickly. It is advisable to cut a pair of wings out of plastic using a paper stencil. Legs can be made either from cardboard or also from plastic. Two buttons act as eyes, and a hat is a regular cover from detergent. The bow and nose can be made the way you like. Each family member can complete the sample with their own invention.
natural material for crafts
All children love to collect Christmas cones on the street. A bird craft made from natural material also comes out funny and interesting. Cute chickens are obtained by simply screwing the wire legs to the cone itself. The nose is made of thick cardboard, and the eyes are glued plastic or shell. To do this, you need to break a white egg very carefully, rinse the middle well and draw black pupils with a felt-tip pen. It remains to glue the shell with thin movements.
Crafts from threads for yarn
To make crafts from threads (birds, horses, anything you can create), it is not necessary to be able to crochet. Although this is very helpful. But for such a toy, we only need a little cardboard, a lump of paper and thread - three different options for the color of the skein.

Let's explain in more detail here:
- Wrap the red and yellow thread on 12 cm cardboard boxes and cut. Then you get even stripes of thread.
- Roll them together to make a ball. This is how we form the head.
- The center will be a lump of ordinary newsprint. Wrap well-crumpled paper tightly in a gray thread.
- Then the final touch - we connect and twist everything. The legs, in order to hold well, need to be screwed into a ball of paper.
Using different colors, you can make all sorts of crafts - bullfinches, sparrows or tits. You can thus make a whole poultry yard of threads.
Christmas tree toy. Crafts birds from the material
It is easy enough to sew a toy bird from simple shreds of fabric. It is only necessary to cut two identical blanks from the same fabric. You can choose color or plain. Sew on a "wing" to each side in advance. No more difficulties.

It remains to sew fabric shreds, but not completely. Since it is still desirable to fill them with any wool or other remaining shreds. And of course, the bird needs beady eyes and a beak. If you sew a ribbon into a toy, then for the New Year you will have a good Christmas tree toy.
origami bird
The most interesting occupation is still origami. The art of paper folding has become popular since the 19th century, when Europeans discovered this wonderful world of crafts. Probably everyone has seen paper crafts, birds can be made in more simple form, like a flat figure, and complex. The simplest craft is an origami crane. It is done by everyone who begins to learn this art. This craft is generally considered the main blank for more complex crafts.
Those who take the time to practice origami will be able to create such a figure as this voluminous chic peacock.

The figure is quite complex, although it is considered a classic. So, how to make such a peacock? We will follow the plan, since the scheme is too confusing due to the abundance of small folds.
- We take a sheet of paper 20 x 10 or 30 x 15.
- Fold in half to make 2 equal squares.
- From one square we make a double triangle.
- We bend the upper triangle in the center. We need a center line.
- We bend one and the second half of the triangle to this central axis; you get two small triangles. We also bend their lower parts to the center, and we understand the angle upwards. Then these corners are lowered; we only need the curves that form the diamond shape.
- You should get a triangle with "paws" like what is done for the "jumping toad" craft.
- The bottom corners now need to be turned outward. Expand these triangles on the sides. They should look like 2 diamonds lying at the base of a large triangle. Now you are making the legs of the peacock. They need to be made thin, so with precise, gentle movements, take these small rhombuses and make them half as small by bending their sides. Fine motor skills of the hands are involved here, if the fingers do not immediately obey, do not despair.
- Next, you need to bend the entire model in half (along).
- Now we bend to the central axis formed by the fold the left and right corners of the main figure. We bend the corners under a small rhombus, where we will have the legs and head of a peacock.
- The next step is to draw a line separating the body and tail. This vertical line will be very useful to us.
- We begin to create a tail by dividing the paper into equal parts, starting from this line.
- The tail will be frilled. The repeatedly bent tail in the form of an "accordion" will then be lifted up. The last shares on one side and the other are glued with PVA.
- However, let's leave the tail for now. The upper part must be bent diagonally on both sides and the basic “hare ear” figure folded. After that, the legs are lowered, and the tail is fixed in a vertical position. Our peacock is slowly taking shape.
- Now we glue the tail, form the head and bend the legs so that the peacock can stand.
It is worth noting that the paper should not be taken too hard. After many deflections, such paper does not obey fingers well. And it is inconvenient to work with thick paper. All lines must be clearly ironed. Clear and even, they look good. And you can’t wrinkle the paper once again, you will ruin the figure.
origami wonder swan
In fact, origami has practically no boundaries. In this technique, you can make any figure, any paper crafts. Birds of different levels of complexity fill the shelves of lovers of this art.
Imagine another classic swan created by Robert Lang - a popular author of many models. In mastering the new model will help us step by step diagram with explanations for each step.

This scheme does not require knowledge of the basic basic forms or special fine work with the fingers.

Now, after learning another craft model, paper birds might be a new hobby for someone.
Paper swallow. Scheme
There are several forms of swallows. Different origami masters come up with their own schemes. The one we give as an example is very similar to a real swallow, and at the same time, making all the folds will not be too difficult for a beginner. We remind you how the diagram is read: dashed lines are folds. The arrows call for folding, the arrows in the form of curls are turns to the other side.

This is one part of the job. The scheme must be followed in the smallest detail. Make sure you don't go wrong anywhere. Then start studying the second scheme and continue to work.

For practice, make a few of these swallows. DIY paper bird crafts can be stored in a closet for a long time or hung with a thread. After all, a paper product will also look good on a Christmas tree.
The beauty of modular origami
More interesting do-it-yourself paper bird crafts can be seen at handmade exhibitions. There are often exhibited large crafts from many hundreds or even thousands of small details. Such things are called modular origami. You can make a swan, a rooster, and a peacock in this way. Incredibly beautiful is the macaw parrot, made in this technique. And it's exactly like the real thing.
But these products take a lot of time. Everyone can try to make an owl, but you have to be persistent and patient.

If you are ready to take the time to create such beauty, then go for it. First you need to find a photo of bird crafts. It is also important to keep the instructions with you. In each circle, there are a certain number of parts of one and the other color. Nothing can be mixed up here, otherwise the pattern will be distorted and the whole charm of origami will be lost.
Hello subscribers!
It's bad weather outside, maybe the sun is shining? It doesn't matter, because we have an unforgettable time of the year ahead of us. It will be in multi-colored colors and with many surprises, because autumn always presents us with its gifts. But, besides this, it also opens up its natural wealth to us. That is why in schools and kindergartens crafts are immediately made from natural materials, together with other components. It can be vegetables, as well as paper or plasticine, and more. other.
Children, well, just love all this creative work, because they get different funny toys that they can then play with.
In addition to all this, you can even take autumn leaves and make masterpieces or bouquets out of them and insert them into or make something. Well, that's not all, cool souvenirs come out of ordinary cones. So, if you're interested, take a minute and scroll through the entire note from beginning to end. I'm sure you'll find a lot interesting ideas what can be made from natural materials.
Well, if you have any thoughts on this topic, please share below the article and write your feedback and comments.
I would like to start this conversation with what you do not even mean and cannot imagine that everything is much simpler than you think. It turns out that to make masterpieces, you can take the most ordinary sticks, twigs, or maybe you have pebbles or shells. In general, we always have all this at hand, so why not use it.
I propose to focus on products made of stones, which are always available in any area. If you were somewhere on vacation, you could bring these with you. It is advisable to take, of course, smooth pebbles. Take a log or plank and carefully glue the intended composition with a glue gun. Here you can make flowers for example. And to make the craft brighter and more aesthetic, paint it, for this use acrylic paints.

Quite popular is the product in the form of a hedgehog, take a look. In my opinion, there is still not enough mushroom or autumn leaves. So it's easy to fix colored paper and cut out the desired image.

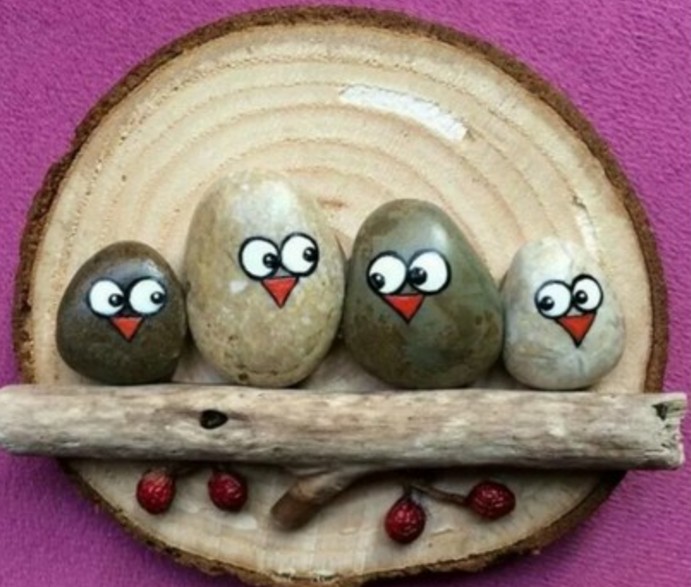
You can decorate the whole picture, make such a cheerful family in the form of birds on wood. As you can see, ordinary sticks are also involved here.
Oh, and by the way, do a still life.

For the smallest kids, take the following composition as a basis. Draw on a sheet of cardboard or A4 Maple Leaf or any other and then decorate it with multi-colored stones.

And if it's even simpler, then choose this minimalist picture. Which do not forget to decorate with multi-colored paints.

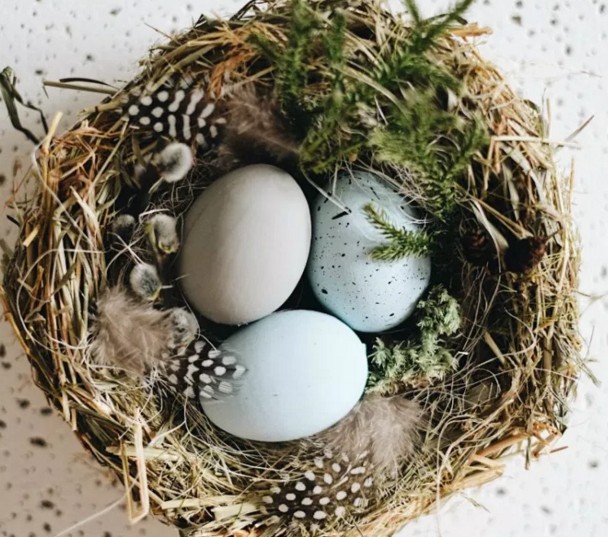
A bird's nest made of straw can be a great idea. You need to cut a circle out of cardboard.

And twist the flagellum from the straw.

And then twist a nest out of it along the diameter of the circle and fix the ends with threads.

In this way, wind in a spiral, so that in the end you get a bed in the form of a cup, glue the straw on the glue.


Then fill the souvenir with fluff or feathers and lay eggs, cones.
If you are a lover of pumpkin or sunflower seeds, then you can create something fantastically beautiful. Take a look at this photo. It was awesome! The author took and decorated a hedgehog, and his spines with ordinary seeds and painted autumn.

But here pumpkin seeds were used, by the way, you can come up with a lot of all kinds of masterpieces from them. In I have already shown you several of these works. Now I'll show you this one. Who knows, the seeds are painted with paints, gouache or acrylic, and then glued.

Here the artist did not use glue, but planted everything on plasticine. The tree trunk is made of buckwheat grains.


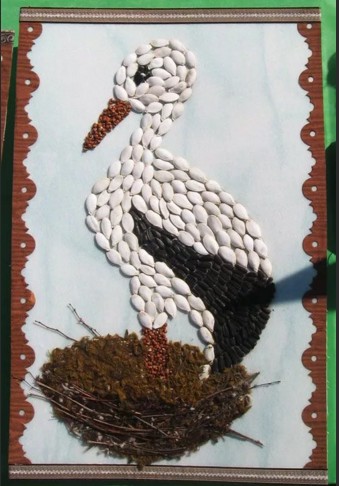
A stork is also made from pumpkin seeds, such a panel comes out, or hang it like a picture on the wall and admire.
I was shocked by another amazing and cool craft, I mean a chicken from which the author made different seeds. For this masterpiece, you need pumpkin and sunflower seeds, as well as plasticine.

1. From plasticine, mold the base, that is, the head and body of the bird.

2. Then start decorating the chicken by sticking the seeds one by one, as shown in the picture. First there will be wings.

3. And then the ponytail. It already looks funny.
Do everything carefully and take your time, it is from your efforts that success will await you.


5. Make a crest from red plasticine, and a beak from yellow.


I also really liked such trees made of beans and watermelon seeds.

And you can also combine several types of natural material and get a picture. For example, how oats are also used here, and the rim is made from corn kernels.

And remember, in childhood, they let airplanes in, so I also recommend making souvenirs from them. I mean maple.

This also includes crafts made from dry materials. Such a radiant sun.

Or a clearing and a woodsman.

Above all, use straw or acorns.

You will get not only paintings, but also little men and insects from chestnuts.

At school, I always remember that at labor lessons they made such cheldobeks.

Well, if you have a handful of pistachios lying around, or rather a peel, then imagine you can become a real decorator. Make this topiary.

Well, or a vase and insert dried or fresh flowers into it.

Well, in conclusion to this chapter, I want to impress you. I found one fun pattern that you can easily follow. All you need is a board, nails and woolen threads.
Circle the maple leaf on the plywood and drive in the carnations along the contour.

Walk along the contour with an orange thread.

Then begin to confuse in a chaotic manner, as if applying patterns, a spider's web. Great, did you do it?

I also like such a funny story in which the author took ordinary logs and laid out such birds.

These friends are somewhat like snowmen.

Crafts for elementary school "What autumn gave us"
Of course, to make compositions on this topic, it is enough to have everything you need at hand. This means you need natural material, and improvised means. Plus your desire, imagination and of course fantasy. If it’s really hard and inspiration doesn’t come, then take these ideas and create.
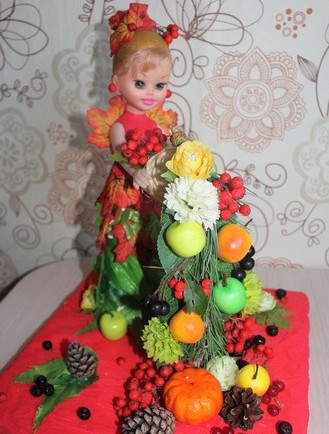
I suggest that the girls take their favorite doll and decorate her with such a golden outfit.

So it turns out you can go to the park and collect dry leaves and you are already a magician).


Brilliant, isn't it? Such a queen came out of an ordinary toy.

Do this work from physalis.

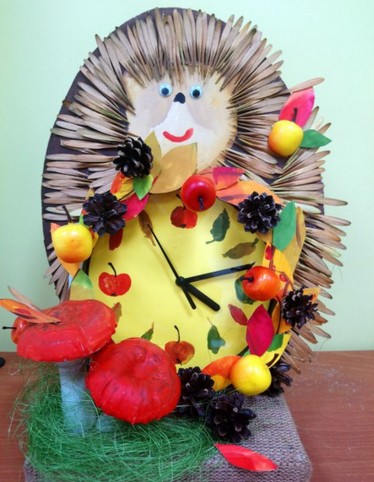
Or, for example, build an alarm clock or watch from twigs.

A sprig of mountain ash and cones will help you decorate.

Well, not in last place, probably the most popular will be crafts using seeds. I always see such creations at exhibitions in kindergarten and school competitions.


Everyone knows that autumn is rich, so make wonderful masterpieces.


By the way, decorate your class awesomely by making garlands of acorns, chestnuts and rowan berries.

Or here's an idea.

Make a gossamer and bring it to school.

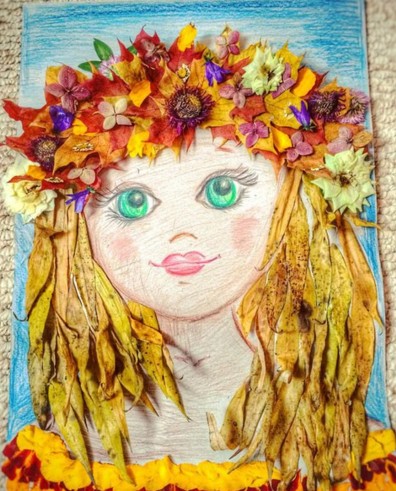
Probably the most enchanting will be such a charm, well, a direct symbol of this time of year in all its glory, this is the face of a girl. Take any flowers, plants and create.


You can make such a portrait. I think students elementary school and even preschoolers will cope with such work with a bang. Well, really secondary school especially.


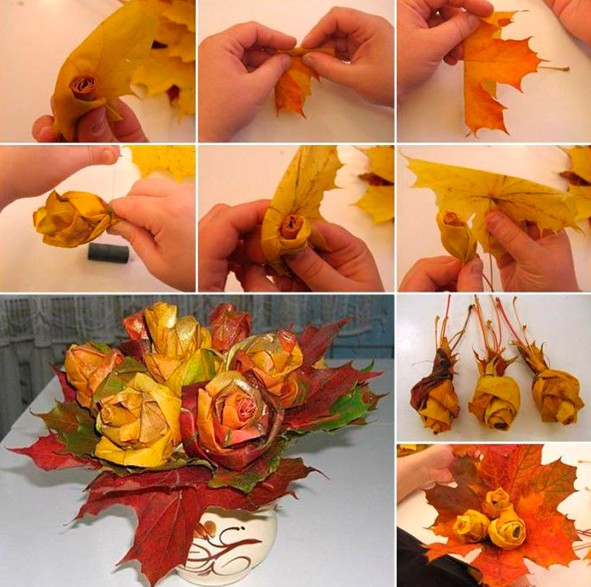
Such a gift looks superb, these are roses, but unusual ones, and from maple leaves.

You need to learn how to fold the leaves correctly, here is the sequence of actions. Watch this short tutorial:
On this topic, how to create such a bouquet, I found this video on the Internet on the YouTube channel. Maybe it will be useful for you too. Happy viewing.
You can make a beautiful wreath.


Do not forget that it will not be difficult to build a lot of creations from spruce branches.


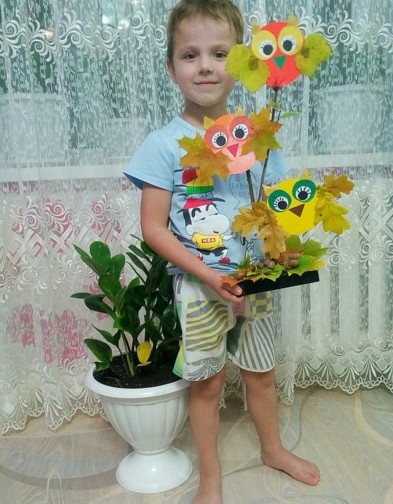
What a cute owl came out, you can't take your eyes off.

You can build an oak, look how wonderful it turned out.

Here's another idea, take note.

Autumn work in kindergarten from natural materials
I think the kids will like the work called the application. Cut the leaves into squares and stick on landscape sheet in the form of any character.

Also such an unusual tree can be a good idea. I would say magical, on the one hand it has winter, snow or hoarfrost, and on the other - foliage.

You will need to make a trunk out of plaster, like a stand, and stick the collected branches into it. Let your kid decorate it now as shown in the picture above. Make a snowball from cotton wool, and greens from dry grass and leaves, flowers.

Or you can make spiders or a hut on chicken legs with Baba Yaga. After all, children are very fond of fairy-tale characters.


And if you want to go in a non-traditional way and take shavings from simple or colored pencils as a basis and create such beauty.

Also create figures from walnuts in the form of a bear.

And here is such a little mouse.

Here are a couple more mice.

The panel with the use of rowan berries also looks great.

You can take the following option as a basis, make the leaves out of paper in the quilling style, and glue the mountain ash.

Here is such a funny kitten, well, it will obviously cheer everyone up.

I also want to invite preschoolers to make a smart owl.


It is easy to build the following from tree cuts.

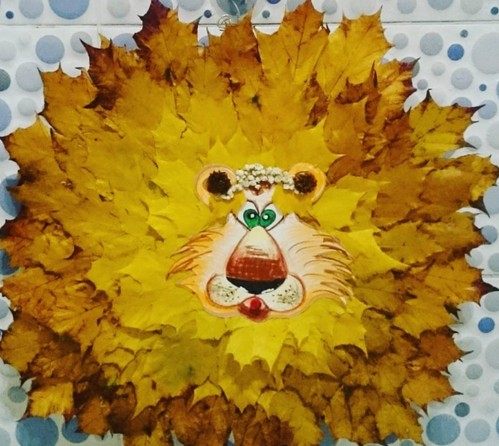
Or make a lion cub or a lion.


Also willingly stop at simple models that are carved as follows.

You can also draw, take dry leaves of trees as a basis in the form of stencils and simply dip them in paint to make prints.

Or this is how you can draw a picture with birches.


The next work, draw the image of a woman or girl, and offer the child to make hair.
Connect your imagination and build little animals or animals.

It is interesting to make a boat.

Or make a peacock or a firebird.

Toys and souvenirs from cones: fast and beautiful
Well, now I present to your attention all the most interesting of acorns, cones and probably plasticine. Because it is this component that will help to recreate new toys and souvenirs.
Before you is a picture that is made with the help of paints, a background and multi-colored cones are drawn, which are also painted acrylic paints.

The next work, this is such a cute topiary, from all that was in the forest. Here are sprigs of Christmas trees, cones, berries, even acorns.

Love Masha and Misha from the cartoon, then you will like the next idea.

On this topic, I found for you the news of this year in this video from the YouTube channel. So don't miss out!
Well, a couple more ideas that you can translate into reality.
These can be birds, such as an owl or a swan, as well as a basket of cones.

It is easy to make an angel in the form of a doll, or a pendant.

They even make squirrels, but also, in addition to plasticine, felt fabric is used.


In addition to all this, you can also take any fruits and vegetables and arrange any composition using natural material.

Original crafts from leaves on the theme of Golden Autumn
If you have absolutely nothing to create from, then take and collect foliage in the parks and you won’t believe it, you can make such creations from it. Even kids 2-3 years old can handle it. Well, especially schoolchildren. I have one child in our house lives and studies in the third grade, so he painted the collected leaves like this.

And my son and I, who is already 5 years old, will almost be 6 soon, we will do such a miracle. Here is a butterfly, he chose the second one, and which one do you like better?

To be honest, I also really liked the hare and the fox. Look, even the bark has been adapted.


And what is this bird? Peacock, wow, and her tail is beautiful!

Well, the next composition in the form of an aquarium and fish can still be a great idea.


In addition to all this, you can easily and quickly create insects.

But probably the most beautiful and charming will be crafts in the form of maple leaves, they are folded in an unusual way, in the form of roses. Here is a tutorial on how to make this beauty. Repeat all the steps as shown in this picture.
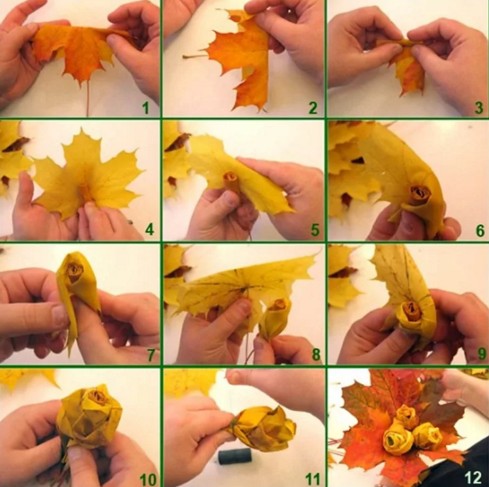
Here is what should come out in the end.

It is possible to make flowers of absolutely any kind of leaves. This video will help you, watch the master class.
In addition, take an ordinary vase and place dry branches in it and decorate with foliage.

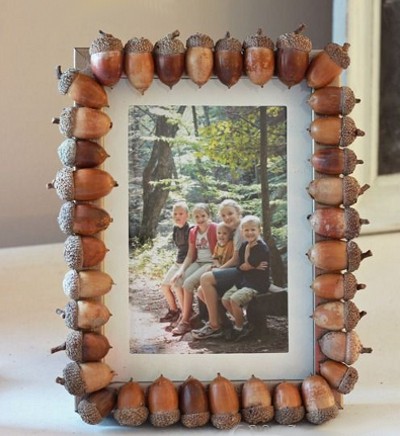
And also any photo frame can be presented in an unusual way.

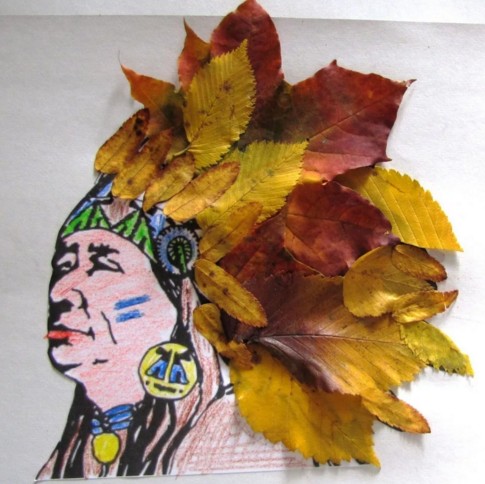
Well, make a leader for the boys who love the Indians.
And here are some more cool ideas on what you can think up and do from leaves. Here are the children's creations.


As you can see, there is nothing here. Turtle, snail, helicopter and even a mischievous parrot.


Or lay out the fabulous Petya cockerel.

In addition to all this, you can go in a non-traditional way and make pictures.

And if you do not have enough sun, then here is an idea for you.

To decorate the interior, and well, you can also bring a vase of maple leaves to an exhibition in a school or kindergarten. How to make it? You will need PVA glue and a balloon.
In short, you can look at these steps and build such a creation right today.

Or consider these stages of work.
1. Inflate a balloon, apply PVA on it with a brush and immediately apply the leaves.

2. Here's what should happen.

3. On top of the leaves, also apply glue without sparing.

4. Now let the blanks dry completely, and then pierce the ball with a needle. Now fill it with fruits and vegetables and quickly for the holiday.

I think that after reading and viewing this note, you no longer have questions about what can be made from natural material, I think I have found enough ideas. Just take it and do it.
All the very best and positive. Bye!
Sincerely, Ekaterina
Every year, nature gives us a lot of natural materials suitable for creativity for free. The process of creating with your own hands develops the artistic taste, thinking, memory of the child, cultivates perseverance. But most importantly, you can have fun and usefully spend time with friends, delighting yourself and others with crafts.
Preparation of natural materials for their further use
Nature is the best artist, it creates such natural materials that turn into works of art in skillful hands!


plant materials
chestnuts
Chestnut fruits have a bright brown color and a shiny surface, so they make excellent DIY crafts from natural material. The shell of a fresh chestnut is thin, easily pierced with an awl. Chestnuts are a fertile material for working with young children themselves. You can make many different dolls,.


It is better to store in a cool place in boxes.
acorns
Oak fruits ripen in autumn, in September-October. collected in various shapes and sizes.


At the same time, their cups (pluses) on which they are held are also collected. Plushs are very often used separately from the acorn, as an independent natural material for various crafts.

Acorn cups and balls knitted from wool
How to knit even balls of wool, see the video Olga Skibina:

Acorn buns and Christmas bells


You can store them for a very long time, after washing and drying thoroughly. But why just keep stones when you can play with them with the whole family?)


For another way to apply an image to river or sea stones, see the video from You Can Do It Craft. You will be surprised how easy it is!
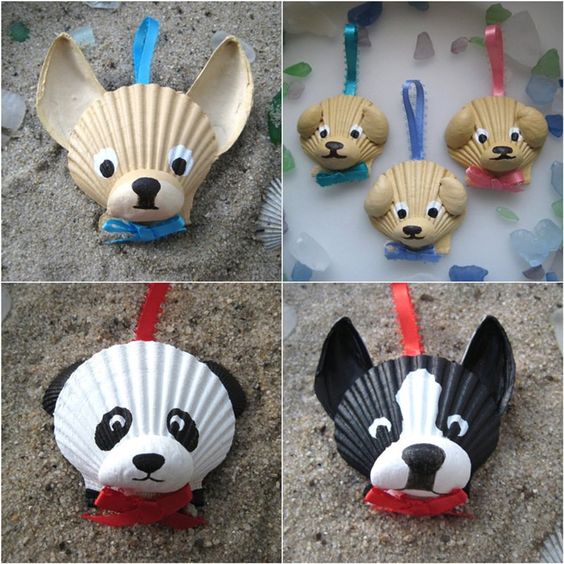
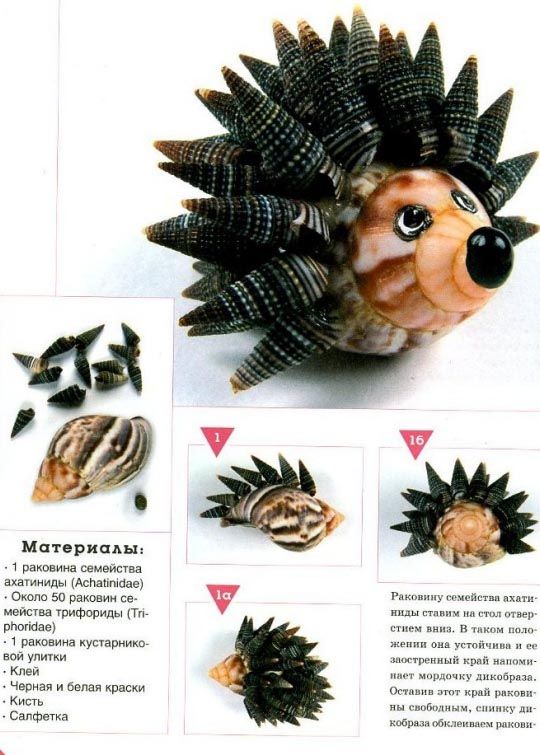
shells
You can collect shells on the banks of rivers, seas, lakes while relaxing with your children. Many of them are original appearance, in shape - oval, comb-shaped, elongated, etc.
Boil them for a few minutes to free them from living organisms. Shells are washed with a small brush (you can use a toothbrush), after which they are dried, sorted by type and size. Stored at any temperature.
You can also clean the shells in a solution of whiteness and water at a rate of 1: 1. The top layer will disappear after a while, leaving the shell with a nice shiny top.
Animal figurines are made from large shells.

Small shells make wonderful applications, garlands:


Shells can be used not only as the main material, but also as an additional decor (bird wings, dog ears, flower petals, etc.)


Sand
Very affordable material that can be collected in any sandbox. It differs in structure. Rinse and dry thoroughly before use. And then you can use it as a decor in your work:


Rules for the storage of natural materials
Crafts made from natural materials with your own hands will be flawless if, after collecting, drying, pre-treatment, you properly store these natural gifts. To do this, you must adhere to certain rules.
- A dark, cool and well-ventilated area is the best place for storage of natural materials.
- Can buy plastic containers for storage of each type of materials; use carton boxes from under shoes, tea, sweets; take the usual glass jars with screw cap. For seeds, as well as for beads, it is better to have a container with many compartments.
- Dried flowers are fragile and break easily, so they are placed in a tight box or container. Petals are stored separately from flowers. Flowers with a stem can be stored in a vase.
- Prepared leaves are also brittle. You can store them in large books. Also, for safety, put them in signed candy boxes, grab a little tape so that they do not accidentally open.
- Seashells are placed in glass jars or plastic containers with a wide neck so that they do not crumble.
Additional tools for crafts made from natural materials
To create a beautiful craft from natural materials, you will need additional tools and materials.

It can be:
- colored paper;
- cardboard;
- skin scraps;
- scraps of fabric;
- bird feathers;
- Styrofoam;
- plasticine;
- wire;
- PVA glue, "Moment";
- gouache;
- stain;
- varnish etc.
Paper very often used as an addition to natural materials. Children, bending, gluing it, make the work much more interesting.
Plasticine fasten separate parts of simple toys at the initial stage of work. It is not very durable, but as a supplement it is often used in kindergarten and elementary school.

From wire most often they make the frame of a toy, the connection of its parts. Copper wire diameter 0.29-0.35 mm - soft, flexible and durable - the most comfortable. And for the frame, a wire of a larger diameter is used - 1-1.5 mm.
Threads it is better to take thick, multi-colored ones (No. 10).
Glue it is better to take white PVA, BF, etc. However, in kindergarten it is better to use PVA glue.
They also use foil, pebbles, pits from cherries, and bristles.
Additional material is best stored in a small box with cells for each type of material.
Usage additional material depends on the idea, the skill of the children, the degree of development of the imagination! Offer your options, but rely more on children's intuition and desire.

It is also additionally necessary to have certain tools for making crafts from natural material:
- artistic scissors;
- awl;
- jigsaw;
- tweezers;
- pliers and wire cutters;
- sewing needles;
- brushes for glue and paints;
- cotton cloth for wiping off adhesive residue.
Scissors for children should be with blunt ends, small, with rings convenient for a child's hand.
Awl you need to take from a durable material with a handle length of about 6 cm, a diameter of about 2 cm, a stabbing part - 3.5 cm
Needle need a large sewing machine. It must be kept in a needle case with a thread threaded into it.
Attention! Only adults use pliers, pliers, drills!
To draw the contour of the part to be cut out, a simple pencil. For example, dresses, hats for a doll, etc. It is better to take a soft pencil (2M).
Tassels(soft for drawing, harder for glue). It is better to buy squirrel brushes (No. 4 and 6). For glue take brushes with hard bristles.
Stack- a tool necessary for surface treatment of clay or plasticine. The length of the stack for children is about 12 cm.
Crafts from natural material for kindergarten
Toddlers are very fond of turning chestnuts and plasticine into toys in their hands that they can play with. Crafts from natural material for kindergarten not very difficult, so with the help of an adult any child can handle it. Sometimes they are made from fruits and vegetables, but most often they are applications from leaves and animals from cones and acorns.
Crafts from leaves and maple "helicopters"
The lightest and available work even for kids - this is an application of leaves. If this is the first time you are making a composition with your child, offer him a picture that will serve as a template. Do not rush to do everything yourself. Invite the child to choose the leaves as desired, so that the work turns out to be similar to the sample. This will develop your child's creativity.
Application material:
- colorful leaves;
- thick sheet A-4;
- brushes for glue;
- PVA glue;
- scissors;
- sample.
To make a simple composition, you need even, dry leaves. Put them under a press or in a book. In two days the material is ready. Cut out suitable parts with scissors and lay them out on a piece of paper.
Now you can glue. First the background and bottom layers, and then the finer details. For example, if you want to make an elephant, then first make the body and head out of the leaves, and then glue the trunk, tail, legs. If there are not enough eyes, then they can be drawn with a marker or made from tree seeds.
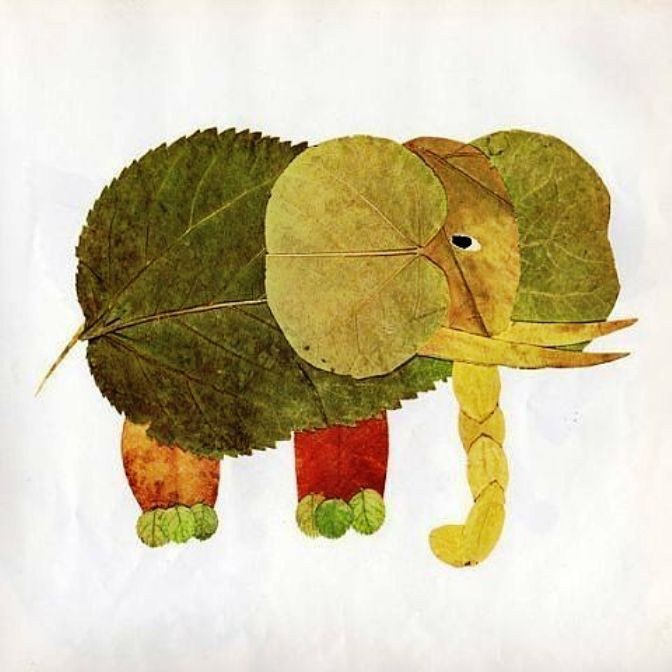
It is not necessary to do everything according to a template. You can come up with a picture yourself and create an original composition of leaves.


Use colored paper, felt-tip pens, paints as an addition, so your applications will be even more interesting.
Along with the leaves, “helicopters” from maple are also ideal as a basis for crafts made from natural material for a kindergarten. Just look at this miracle!

Fairy wings from maple seeds

Dragonflies from maple helicopters
Now you are convinced how beautiful and original leaf applications can be. Use these ideas for leisure activities with children.
Simple master classes on creating children's crafts from acorns and cones
At the end of summer, acorns begin to ripen, and they make wonderful crafts made from natural material for a kindergarten or school. They are well preserved, and on long autumn evenings with children you can enjoy pleasant and useful thing, developing fine motor skills of the baby's hands, imagination and perseverance.
The most common acorn crafts are animals and various little men. From toothpicks, matches, thin twigs, you can easily make legs, handles, horns and other small items. An adult needs to help the children poke holes in the acorns.
To attach small parts, you can use a glue gun, Super Moment glue, but only adults should do this. And it is safest for the guys to fasten the parts with the help of plasticine.

Fly agarics from acorns are even easier to make! To paint acorns, you need to remove the hats from them, and after the paint has dried, glue them in place.


Acorns are very beautiful on their own, and if they are also painted with acrylic paints or nail polish, then such crafts will decorate any home.

And from silver-painted hats you can make original decoration to the Christmas tree. The process of creating such an eco-toy is quite simple: we closely glue acorn caps onto a foam ball (you can take an old Christmas ball). And sparkled new.

We found another video for you, where Niki Junior tells what a wonderful craft will turn out from leaves, cones, twigs and plastic bottle. Look, you will learn a lot.
Categories
We also recommend
 mafia style party invitations
 Gangster themed kids birthday party
 Games for a corporate party in nature in the summer are cool
 Presentation - domestic and wild birds Educational presentation "Such different birds" for children of younger preschool
 How to write a report: an example and recommendations How to write a thematically informative report
 "April 1 - April Fool's Day" methodological development on the topic Scenarios for April Fool's Day in the House of Culture