How to make an envelope from a sheet of paper with your own hands. Homemade paper envelopes for any occasion How to make a beautiful envelope for photos
All people have situations when they need to write a letter, send a Valentine's card, give money for a wedding, anniversary or other celebration. Now it's easy to buy beautiful envelope for writing in a store, but the store and post office don’t offer much variety, but I want to take something non-standard and original for this. Perhaps your correspondence has custom size, and the large envelope is not on sale. And for the celebration I would like to give money to beautiful cover, made independently, interestingly decorated, festive. In this case, you need to do everything yourself. Your efforts will be appreciated, because things made by yourself are always valuable.
It's time to learn how to make an envelope from A4 paper quickly and easily. For registration postal version You will need scissors and one sheet of thick paper (colored/white).
It can be made from kraft paper; it is brown; previously, parcels were wrapped in it. An envelope made of kraft paper is quite durable and wear-resistant, and is easy to make.
It will take even less time if you try the easiest option, how to make an envelope out of paper. Take a sheet of paper, divide it into a couple of parts, one of which will be 4 cm wider than the second. Bend along this line. Then wrap small pieces of sheet on both sides and glue these parts together. Place the unused side on the base, level the line where the fold passes.

And if you plan to use it to give a gift, you can make the product out of colored paper, decorate it with beads, ribbons, even lace.
Let's look at how to make an envelope from a sheet of paper step by step:
- Cut a square from a piece of paper.
- Fold it in half, slightly shaping the fold.
- Fold the bottom edge toward the center.
- Unscrew the side corners and create vertical folds.
- Fold the top corners so that they are longer than the bottom.
- Cover the rest of the part with the top triangle.
- You can use glue to secure it; you can make an envelope from paper without glue using double-sided tape.
For money
It is advisable to put money for a wedding or anniversary in elegant packaging; it is better to make an envelope for money with your own hands.
You will need the following materials:
- thick paper (preferably pastel colors) or glossy A4 cardboard, choose the color to your taste;
- a sheet of paper with an elegant design;
- silk ribbon for finishing;
- rhinestones or beads that combine beautifully with paper;
- satin ribbon 30 cm long.
- scissors;
- hole puncher;
- glue.
On cardboard, draw a diagram of what a rectangular envelope will look like. Carefully cut it out. Bevel small rectangles slightly towards the center so that they fit easily. From the inside, we will draw along the fold lines with a blunt object, this will facilitate the accurate formation of the product. Let's collect the envelope. We mark the places where we will make holes for the ribbon and pierce them with a hole punch. We decorate with lace fabric, pass a satin ribbon through the holes, and tie it beautifully. We glue rhinestones, beads, and add a congratulation.

If you have a problem with how to make an envelope for money, you won’t need a master class if you use the following diagram.

This will make a great envelope.
Using the given drawing, you can make a very interesting men's gift envelope for money, naturally with contents. Any man will be pleased to receive such a voluminous present as a gift.

If you are planning a gift for a baby, or a child will give it, you can arrange everything in children's style, make from bright pieces of paper, stick on several images of animals or cartoon characters, and decorate with a voluminous bow.

Origami
Using origami technology, it is possible to create any paper crafts. Let's look at how to make an origami envelope out of paper.

For Valentine's Day or just a loved one, you can quickly create a very beautiful heart. Using the following diagram, you will understand how to make an envelope out of paper with your own hands.
In such a bag you can put a love confession, a tender wish, or invitations to your favorite premiere.
You can decorate a cute heart with beads, sparkles, lace, and flowers.
Disc packaging
Everyone periodically faces the fact that disc packaging breaks and bags are torn. Let's figure out how to make an envelope out of paper for a disk quickly and cheaply. Let's make it from A4 sheet.

Square envelopes are made quite simply:
- We place the disk on the long side of our sheet in such a way that its middle coincides with the middle of the same edge.
- We wrap the paper according to the diameter of the desired disk.
- We fold the sheet bent along the side surfaces along the center line of the diameter/area of the disk. The result is a pocket for the disc.
- We wrap the remaining piece of paper to the disk and smooth it.
- We turn the same sheet back and form small folds.
- We insert this edge into the pocket on the opposite side.
It is good for home storage, and if a festive option is important, you can use the following diagram and understand how to make a small elegant case for a disc out of paper.

These envelopes are made quite simply with your own hands; they require elegant paper sheets; you can decorate them in various ways, taking into account the taste of the recipient.
For any occasion
Let's look at how to make an envelope for money, for letters, greeting cards, invitations - for all occasions. Take some beautiful holiday paper, use the template provided, and you won’t have any problems making a simple square envelope. You can decorate it with beads, ribbons, lace braid, give full play to your imagination.

It’s very easy to understand how to make a simple cardboard envelope. You need to take a square sheet of paper, round all the corners with a compass, and bend them towards the center of the square. Fold it, tie it with an elegant ribbon, decorate it with flowers or beads. The packaging for a note, a small surprise, a letter is ready.

The choice of materials for making packaging is huge; it is paper of any shade with all kinds of patterns, quite varied in texture, from which you can make Postal envelope or original envelopes for the holidays. Making a gift envelope from it with your own hands is a fun and simple process. Use your imagination, focus, and you will definitely succeed. beautiful product, in which it is pleasant to place money, congratulations, a declaration of love.
A regular envelope for a letter is bought at the post office, but not every item is worthy of a standard paper “pocket”. It’s much nicer to receive romantic messages and greeting cards in an exclusive envelope, lovingly decorated with appliqués and hand-painting. A beautiful holiday envelope gives the first impression of a valuable investment. And to emphasize your reverent attitude towards the recipient, you should fold a cute paper envelope with your own hands, using the origami technique and your own imagination.
Homemade paper envelopes
It should be noted that a homemade paper envelope is also useful in everyday life. You can use the simplest “pockets” as an envelope for a disk or, for example, make an envelope for money and store untouchable savings in it. Whatever goal you pursue, you will always have enough available materials - A4 sheet (or other sizes), and self-adhesive stickers for sealing paper envelopes made by yourself.
 A homemade envelope can be used for any purpose!
Additional materials
The traditional art of origami does not involve the use of materials other than paper. Indeed, in classical technology there are schemes according to which a simple origami envelope needs to be made from paper and nothing more. It folds without glue or other fixing components. But following your creative plan (original applications, decorative decorations), you may additionally need:
- Sheets of colored paper or paint, felt-tip pens or colorful stickers;
- Bright beads and ropes, original buttons and other decorative items;
- Scissors and office glue, a stapler or a little sealing wax;
- Any other decorations for a homemade paper envelope as desired.
Homemade envelopes for different situations
 Any materials are suitable for decorating envelopes!
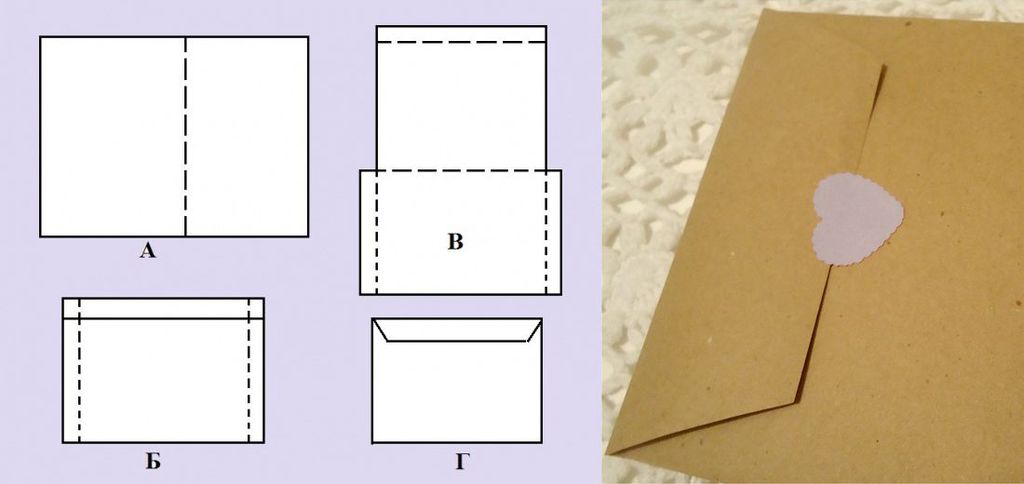
Option 1: the simplest rectangular or square envelope
Following schemes 1 and 2, you can fold simple envelopes for postcards, photographs and letters. It's easy and fast, however, trying to avoid banality, use not simple, but colored paper. Or pre-print sheets with original ornaments on a printer. Next, follow the instructions step by step, referring to Figures 1 and 2 as needed.


- Take a paper sheet of the correct square shape;
- Fold the sheet diagonally - their intersection will determine the center of the workpiece;
- Fold each corner of the sheet exactly to the center, evenly bringing the edges towards each other;
- Seal the envelope in the center, covering all corners with an adhesive sticker;
- Change the shape of new envelopes by reducing the folds on the sides of the workpiece (see Fig. 1).
Similarly, an envelope is folded from a piece of paper, which has been previously given the shape of a rhombus (see Fig. 2). The corners of the sheet are evenly bent towards the center and fixed with a self-adhesive sticker. By changing the uniformity of the folds, you can achieve the desired overlap sealing the envelope.
Option 2: envelope for banknotes
If you set out to make an envelope for money or CDs in a couple of minutes, you can use Scheme 3. You will need a standard sheet of A4 paper and a sticker for sealing. Such a product is ideal for banknotes, and to prevent coins from falling out of it, you can additionally stitch the edges of the money “pocket” with a stapler. Using fig. 3, step by step:
- Place an A4 sheet of paper horizontally in front of you;
- Fold it like a closed notebook, but not exactly in half - leave 2-3 cm of the sheet “walking”;
- Unfold the workpiece, lay it vertically, bend the side stops inside the sheet;
- Fold the workpiece again along the central fold, tucking the folds inside the envelope;
- Wrap the “walking” section of the sheet towards you - it will close your envelope;
- Seal the envelope with a sticker and, if necessary, staple the edges (or glue along the seam from the inside).
Option 3: without glue and stapler
An origami envelope made from a sheet of paper without the use of any extraneous “fasteners” looks quite intricate. Looking at Fig. 4, you can fold it too, spending only 2-3 minutes. for the entire folding process.
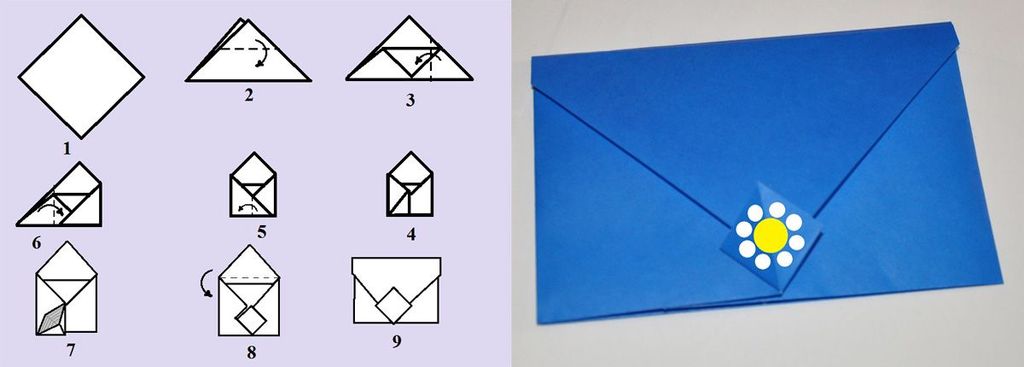
- Fold a square sheet of paper diagonally, creating a triangular blank of the correct shape;
- Bend down one free upper corner of the workpiece (do not fold the second one), aligning it with the lower border (see Fig. 4);
- Then bend the side corners inward, boldly overlapping one another;
- Bend the overlap back, along the center of the workpiece, form a pocket from the resulting corner, carefully opening the small bend;
- Fold the top of the envelope downwards, tucking the sealing overlap into the resulting pocket, pressing the folds tightly.
Heart" and other figured options
Not everyone knows how to make an envelope out of paper for romantic messages and pleasantly surprise the object of their adoration at the same time. But there is no particular difficulty here either. Let's look at how to fold a small heart envelope step by step. You will need a blank of a predetermined shape.
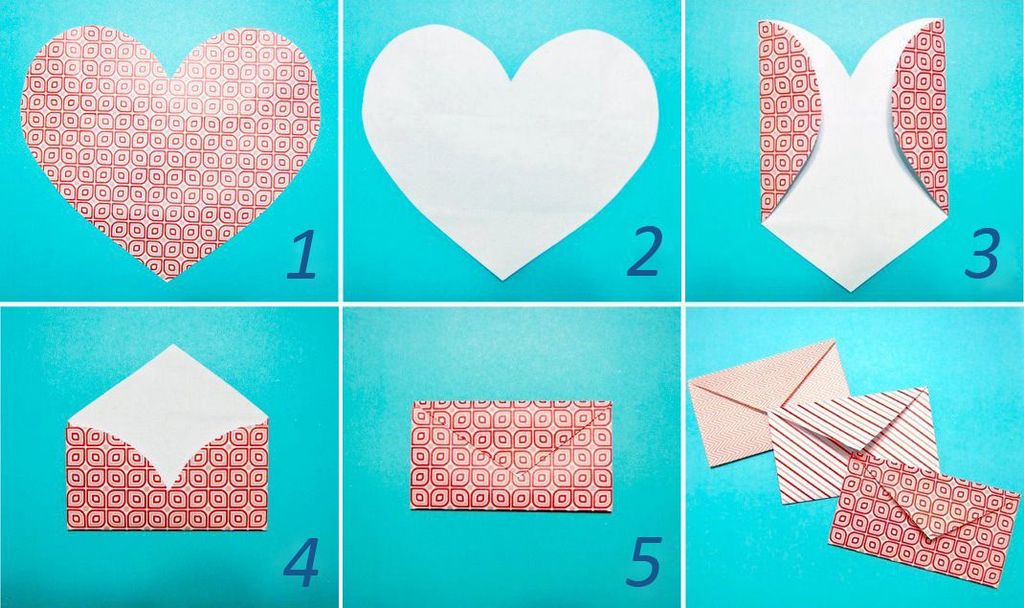
- Take a sheet of paper in the shape of a heart (cut according to a template, you can draw it by hand);
- Bend the sides of the “heart” inward, then do the same with the upper part of the workpiece;
- The bottom "sharp" side folds inward towards the last one (it closes your love envelope);
- The resulting rectangular envelope is sealed with a sticker, filled with sealing wax or tied with a scarlet ribbon.
Would you like to make an envelope in other fancy shapes? Then just use ready-made “pocket” templates for special letters. Just print the blanks on regular A4 paper, cut them out and fold along the drawn edges - that's all. And if you are planning to make a large paper envelope for a grand congratulation, just transfer ready-made templates on Whatman paper A3 (and bigger size). Don’t forget to brightly decorate your homemade paper envelope with rhinestones, stickers, beads and appliques - let it become the most memorable event of the upcoming holiday. Or, made by yourself, can be an excellent companion for your gift.
No matter how original the envelopes in stores may seem, they are not endowed with the most important thing - a soul. How sometimes you want a person to give you a nice note or a gift in an envelope, or send you a letter from another part of the world. What would it be like to feel that this is not a soulless shopping envelope, but made by the hands of a person to whom you mean a lot.
In fact, there is nothing complicated about this - just take an A4 sheet and show a little imagination. No matter what anyone says, gifts made with your own hands are very valuable. If you think that you do not have enough skills and imagination, we advise you to throw these thoughts away. It’s not for nothing that they say: the eyes are afraid, but the hands do the work. Well, we decided to invite you to make an envelope from a sheet of A4 paper with your own hands. In addition, we will show master classes on how to make an envelope from A4 sheet for any holiday, event, and so on. Step-by-step instructions will help you in mastering the information, which clearly shows all the actions with a piece of A4 paper.
Envelope templates
To begin with, to make it easier for you, we will present various envelope templates that can be easily made with just scissors, 1-2 sheets of A4 paper and glue.


Master classes on making an envelope from A4 sheet
Master classes are more than just diagrams. This is already a visual representation of what can be done with a sheet of A4 paper in real life. In addition, the master classes will tell you how to decorate the resulting envelope in an original way.
To cover all areas, we decided to present master classes on performing different types envelopes from a sheet of A4 paper, depending on their purpose.
So let's get started!
Paper money envelope
One of the most important uses envelope - as a gift to a friend, loved one or even a colleague. We usually put money in such envelopes, accompanying the gift with a fiery speech. I wouldn’t want a homemade A4 paper envelope to get lost among others. Let's try to make it as interesting as possible.
What do we need? We will need:
- scissors;
- ruler;
- 2 sheets of A4 paper (we suggest you take one plain sheet of paper, the other with contrasting patterns);
- glue;
- a pair of satin ribbons (one will be upper, the other lower).
We decided to get a little creative and used wallpaper that was left over after a long renovation as a basis. For this reason, the paper will seem different in texture to you.
Step 1: A piece of 20x40 paper was taken as the base. We will continue to create from this rectangle.

Step 2: Fold a piece of paper in half inward as shown in the photo above. Now bend the other edges of the product also towards the center.

Step 3: Unfold the work you just did. Bend the sides with a corner, as shown in the photo.

Step 4: Now you need to unfold the sheet back. It's the turn of the bright paper. Glue a small piece of colorful paper to the base of the envelope.

Step 5: Hide the remaining bright paper inside the regular sheet of the envelope. It should look something like this.

Step 6: Now take the ribbon you prepared in advance and glue it in the center of the envelope, only on the reverse side.

Step 7: We took 2 ribbons - a wide white one and a thin blue one. Now we put a thin ribbon on top of the white one to brighten up the envelope.

Step 8: Tie a beautiful bow in the center of the envelope on the front side. Don't forget to process the cut parts of the ribbons. To do this, you can use a regular lighter or matches.

DIY mail envelope
In order to practice creating the most ordinary white paper envelope for sending a letter, we only need:
- a sheet of white A4 paper;
- scissors;
- as well as double-sided adhesive paper or regular glue.
Step 1: Fold a sheet of paper as shown in the photo (triangle towards the center). You should end up with a square with equal sides. The part of the paper that is outside the square will need to be trimmed.

Step 2: Now we take scissors and cut off the unnecessary part of the A4 sheet.

Step 3: Place the resulting figure so that in front of you there is no longer so much a square as a rhombus. Try gently bending the right and left corners of the diamond so that they touch in the center.

Step 4: Fold the marked sides.

Step 5: Pull the bottom corner and bring the three corners together at the center of the shape. Almost everything is ready. The corner at the bottom should be slightly higher than the side corners. We do not touch the upper part of the product yet.

Step 6: Fold the corner of the bottom side inside the pocket. This way you ensure the safety of what you wrote there.

Step 7: Fold the top. All is ready! You can now enclose the letter and secure the “lid” of the envelope with double-sided tape or with a regular drop of glue.

Gift envelope
In this master class we took a more serious approach to preparing a gift envelope. The whole concept is based on scrapbooking motifs, which fit perfectly into this style.
What do we need?
- basis - diagram;
- cardboard sheet of paper;
- 2 types of colored paper and a regular sheet of A4 paper;
- satin ribbon;
- glue, scissors, ruler;
- various small details: beads, butterflies for decoration;
- and the most amazing tool - the sewing machine.
Step 1: Taking one of the diagrams presented above as a basis, we will make a cardboard cutout like this.

Step 2: Prepare two strips of colored paper, the size of a cardboard sheet. However, do not forget to slightly reduce the height so that the sheets fit neatly into the envelope.


Step 4: Along the edge lines of these leaves we make a frame from prepared ruffles.

Step 5: Glue the cut out colored strips together as in the photo.

Step 6: Glue the paper onto the cardboard (on outside our crafts). Next we get sewing machine and go along the edges with a white thread (carefully along the top line, not missing the corners).

Step 7: Important! Before you glue the back and leaf together, thread a satin ribbon through it.

Step 8: Tie a ribbon at the front, add a message or decorative elements of your choice. For example, we made a butterfly on the top corner.

Origami envelope
We invite you to watch a video on how to make original envelope IR-origami, which you can delight your children and even friends with.
Video: how to make an envelope from A4 paper with your own hands
You can learn other ways to make cute envelopes with your own hands from the videos below.
Send a letter - modern youth associates this action only with by email. But sometimes you have to send paper letters, but they require an envelope. In the era of electronics, you won’t find such a small thing in every home, so you have to think about how to make an envelope out of paper with your own hands. It seems like there is little wisdom, but without skill one cannot cope with such a task.
Sometimes you want no stranger to read a greeting card to your loved one, but sometimes you need to put money in the envelope as a gift. Therefore, we suggest you learn how to make an envelope from A4 paper. Watch the videos provided, repeat the steps of the instructor, and you will be able to cope with such a simple task.
First of all, you need to cut out a square from a standard rectangular sheet of writing or colored A4 paper by placing the short side to the long side and cutting off the remaining rectangle. Next we proceed as follows:
- By folding two corners together, we determine the middle of the inflection line.
- Having straightened the sheet, we connect one of its corners to the middle of the marked diagonal.
- In the resulting triangle, the ends are bent slightly further than the marked middle.
- To keep the envelope in place, the tips of the folded corners are inserted into each other.
The letter envelope is ready. If you put something in it, you can close the top triangular flap and, if desired, even seal it with glue. It will withstand even postage without falling apart or coming unglued. This is an extremely simple design that does not require complex cutting out of shapes and gluing individual elements.
A sheet of paper folded in half will not fit into such an envelope; it will have to be folded at least twice.
Video lesson:

If as source material use a standard sheet of A4 writing paper, you will get a small paper envelope with dimensions of 92 x 135 millimeters.
To begin with, the A4 sheet is folded in half along the short side, the fold line is well ironed.
Then one side of the sheet is folded towards the fold line and bent back halfway. Several such bends form a dense multi-layer strip, to which the remaining free corners are folded. The entire envelope structure is bent along the edges of these corners, and the bend lines are carefully ironed.
The resulting bend lines are markings for further bends of the sheet, which already form the envelope itself. At this stage, you need to carefully watch the video instructions so as not to get confused in the sequence of folding the sheet. In some cases, it is necessary to mark the upcoming inflection lines with a pencil.
The corners folded inward keep the envelope from opening.
Video lesson:

From a standard sheet of A4 writing paper you can make a simple envelope for money.
- The sheet is first bent in half along its length, then again, and the midpoints of the sides are marked.
- The corners of the sheet on one side are bent to the center line, the sides are bent so that their edges do not reach the center line a little.
- The structure is folded in half to mark the bend line, the valve with bent triangles is bent inward.
- The structure is bent again, and its rectangular edge is inserted behind the bent corners.
The result is a rectangular envelope with a flap that has curved corners, quite accurately corresponding to the size of banknotes in denominations of one thousand rubles. Front side remains clean, and you can make any congratulatory inscription or drawing on it. You can put a gift amount of money in an envelope and, without sealing it, hand it to the hero of the occasion.
Video lesson:
Of course, the easiest way is to buy envelopes at any post office. But sometimes situations arise when there is a need for self-production envelope. Perhaps you need custom packaging for gifts, money or greeting cards?
Purchased envelopes were almost never original. And if this is exactly what you need, then the best way out- This is to make an envelope from A4 paper with your own hands. In this case, the originality of the product depends solely on your imagination. But the recipient will certainly appreciate your skills and efforts, because, be that as it may, handmade always held in high esteem.
How to make an envelope from A4 paper
Stock up on white or wrapping paper, scissors and patience. Everything is not as difficult as it seems at first glance! The design of the envelope directly depends on the style of the gift and your personal preferences. Using vintage paper, chic congratulatory envelopes are designed, which can be additionally decorated with satin ribbons, antique stamps, beads or artificial flowers for solemnity.
A small ordinary envelope with your own hands
Now we will tell you how to make a small envelope with your own hands, which even a person far from needlework can handle. So, if time is pressing, and you need an envelope right now, use the following algorithm:
- Take a regular A4 sheet of paper and cut a square out of it.
- Bend it exactly in the middle, but just barely marking the fold.
- Fold the edge of the bottom sheet towards the center mark.
- Fold the side corners of the envelope so as to create vertical folds.
- Then bend the top corners, making sure that they are larger than the bottom ones.
- The result will be a triangle at the top, which must be folded so that the envelope can be closed.
A more complex option: how to make an envelope from A4 paper step by step instructions
A homemade envelope can be classified as the very basic level of the science of origami, which even children can master! It should be noted that a very small envelope is obtained from an A4 sheet, but most often there is no need for more. Accordingly, for a large envelope it is necessary to take large sheets of paper.
Stages of work:
- bending one of the corners of the A4 sheet to the edge, we make a square, and cut off the remaining part and put it aside as unnecessary;
- take the resulting square and bend it clearly diagonally, and turn the resulting triangle with its base in your direction;
- bend the top of the triangle to the center of the base, after drawing a ruler to mark the exact place of the bend;
- then we divide the diagonal into 3 parts, placing points;
- We bend the right and left corners to certain marks, while fixing the folds with a pressed ruler;
- bend the free corner to the previous fold line;
- then we begin to form a pocket, for which a small triangle is placed vertically, and the pocket is opened in different directions using 2 fingers, fixing the deflections;
- and at the last stage we bend the top of the envelope to insert the corner into the pocket. All is ready!

Do-it-yourself A4 paper envelope: a very simple way
This envelope option is considered one of the simplest. To do this, take an A4 sheet and mark, according to the diagram, 72 mm at the bottom left and at the top right. Then draw diagonals and cut off the excess paper. The result is a rhombus, which is the main part of our envelope.
The side corners should be folded towards the middle, and the bottom corner should be placed slightly higher than the side corners. It is very important not to forget to fix each bend using a flat object or a regular ruler.

Do-it-yourself envelope from A4 sheet: master class
Now we will describe another master class, with the help of which we will seal the information written on a sheet of paper in a beautiful and original envelope. To do this, perform the following manipulations:
- Take an A4 sheet of paper, write text on it and fold it straight across the middle.
- Lightly mark the center of the sheet and unfold it again.
- The upper right corner must be folded towards the middle of the sheet.
- Do similar manipulations with the lower left corner.
- Now the edge of the sheet on the right must be folded so that the edge of the triangle folded in step 3 coincides with the cut.
- Perform similar actions with the left edge of the sheet.
- Then you need to rotate the resulting part 90 degrees and bend the upper right corner along the dotted line. In this case, the edges of the figure should coincide. Perform similar manipulations on the left. The product is ready!
![]()
Envelope "soldier's triangle"
During the Second World War, it was not possible to use factory-made envelopes, so the soldiers made their own paper triangles on which they wrote the address. A similar skill can be useful in our time. So how can you do this? regular envelope from A4 paper?
Prepare the following tools in advance:
- A4 sheet of paper;
- scissors;
- paper glue;
- ruler;
- simple pencil.
Are you interested in how to make an envelope from A4 paper? Step-by-step instruction will help you understand all the nuances:
- cut a rectangle from an A4 piece of paper, then align the long side diagonally with one of the short sides;
- when you bend the triangle formed as a result of previous manipulations, it should turn out to be isosceles and complemented by a paper strip;
- take the edges of the strip and bend it to the base of the triangle;
- the result is an envelope tab, which is tucked into the pocket at the top and the product is considered ready.

Envelope with a heart
You must prepare the scissors before work, thick paper or cardboard measuring 300x300 mm, thin decorative paper, decorations in the form of beads or flowers and satin ribbon.
Take cardboard and cut out a heart from it using a template. Using the same template, 1 cm from the top edge, make an outline on decorative thin paper, which is the basis for the envelope. Now we draw lines: horizontal, 120 mm from the top of the sheet, and the same, but lower, 100 mm from the first line.
At the points where 2 lines intersect (forming the outline and the bottom), draw two straight lines of a vertical type. All you have to do is cut out the heart and fold it along the drawn lines. At the very end, decorate the resulting product with a satin ribbon and beads. It’s great if the congratulations are written on the heart itself.
![]()
DIY CD envelope
Does it happen that you need to transport a disk with information, but there is no packaging at hand, or you want to present someone with a disk with memorable recordings? Now we will tell you how to make a simple CD sleeve.
You need to take an A4 sheet and place a disk in the center of its lower part, which serves as a guide and helps to avoid errors in size. Then fold the sides, and the disk should be folded up along with the paper, turning it to the other side.
All that remains is to wrap the top and make sure that the disc lies in the middle of the envelope. Now remove the disk from the paper blank and glue the internal components of the envelope. However, do not forget that there must be enough disk space left! The corners of the upper part should be folded inside the envelope, and the lid should be placed in the pocket.
Is the form ready? Decorate it to your liking and don’t be afraid of flights of fancy! Your efforts will definitely be appreciated!
We also recommend
 How to choose the right cash register Examples of cash register equipment
 Brief information about the specialty
 Breeding methods Plant breeding methods summary
 Andrey Petrov, Director of the Department of State Policy in the Sphere of General Education Petrov Rosenergoatom biography
 Profit What is profit?
 At deadly depths Igor Spassky