Stencils for drawing on T-shirts. DIY screen printing on T-shirts. Stenciling a T-shirt
1. Indicator board (replaceable).
2. Left channel board.
3. Right channel board.
Indication levels:
- First segment 20 mv- 10 segment 150 mv
- 20 segment 300 mv
-.........
-.........
-.........
- 60 segment 900 mv
Calibration was carried out using a millivoltmeter separately by channel and then as a comparison of the two together. Structurally, the microcircuits are located in panels for ease of replacement, for example, for a logarithmic indicator on the LM3915.


It is based on 10 comparators, the inverse inputs of which are supplied with an input signal through a buffer op-amp, and the direct inputs are connected to the taps of a resistive voltage divider. The outputs of the comparators are generators of incoming current, which allows you to connect LEDs without limiting resistors. Indication can be made either by one LED ("dot" mode), or by a line of luminous LEDs, the height of which is proportional to the input signal level ("column" mode). The input signal Uin is supplied to pin 5, and the voltages that determine the range of displayed levels are supplied to pins 4 (lower level Un) and 6 (upper level Uv).
Table of operating parameters of the LM3914 chip

The current consumption with all LED segments of both channels on is about 1.3A with a 5V power supply. The boards do not use an input signal amplifier, but its sensitivity is such that the lower limit (first segment) can be ignited with less than 20 mV of an alternating signal.

The double channel level has a size of 157x32 mm. Each channel board is separate (left and right) and has a size of 157x24 mm. When assembled, the structure has dimensions: 157x32x45 mm.

To set the correct scale linearity, you need to select the low and high level limits for each chip. In principle, it is possible, if desired, to stretch the scale of each channel several times with a given circuit design.

Indicator on LM3915
The LM3915 integrated circuit is specially designed to build an LED level indicator and allows you to visually assess the level and change of the audio signal in the form of a light “column”, “ruler” or a luminous point moving on a conventional scale. The successful design of the LM3915 chip has ensured its worthy place in LED indicator circuits. The wizard invites you to assemble a sound indicator using LM3915 and 10 LEDs. Below is detailed instructions for assembling a sound indicator circuit with your own hands with photos and video illustrations. Even a novice electronics engineer can assemble a sound indicator.
How to assemble an LED level indicator on LM3915 with your own hands
The design of the LM3915 chip consists of ten similar operational amplifier comparators housed in a housing. The direct inputs of the amplifiers are connected through a line of resistive dividers selected so that the LEDs in the amplifier load are turned on according to a logarithmic dependence. The return inputs of the amplifiers receive an input signal, which is generated by a buffer amplifier (pin 5). The design of the microcircuit also includes an integrated stabilizer (pins 3, 7, 8), as well as a key for setting the operating mode of the indicator (pin 9). The microcircuit has a wide supply voltage range from 3 to 25 Volts. The reference voltage value is set in the range from 1.2 to 12 Volts by external resistors. The indicator scale corresponds to a signal level of 30 dB in 3 dB steps. The output current is adjustable from 1 to 30 mA.
Assembly of the indicator is simplified by purchasing a set of parts in the online store using the link https: //ali.pub/2c62ph . The kit includes a board, a microcircuit, LEDs and all the necessary wiring (resistors, capacitors and connectors).
Set of parts “Sound level indicator for LM3915”
Details of the “Sound Level Indicator for LM3915” kit
The sound indicator circuit on the LM3915 is shown in the photo.
Operating principle. A supply voltage of 12 Volts is supplied to the third pin of the LM3915. It is also supplied to the LEDs through the limiting resistor R2. Resistors R1 and R8 equalize the brightness of the red LEDs on the scale. Also, a voltage of 12 Volts is supplied to the jumper for controlling the operating mode of the indicator (pin 9). When the jumper is closed, the circuit ensures that only one LED lights up, corresponding to the signal level. When the jumper is open, the circuit operates in the “column” effect mode; the input signal level is proportional to the height of the illuminated column or the length of the line. The divider assembled on R3, R4 and R7 limits the input signal level. Fine tuning of the divider is carried out by multi-turn tuning resistance R4. Divider R9 R6 sets the offset for the upper level of the logarithmic rule of the microcircuit resistance (pin 6). The lower level of the resistance slide rule (pin 4) is connected to the common wire. Resistor R5 (pin 7) increases the reference voltage and affects the brightness of the LEDs. R5 sets the current through the LEDs and is calculated by the formula: R5=12.5/Iled, where Iled is the current of one LED, A. The sound level indicator works as follows. At the moment when the input signal overcomes the lower level threshold plus the resistance at the direct input of the first comparator, the first LED (pin 1) will light up. A further increase in the sound signal will lead to the comparators being activated one by one, which will be indicated by the corresponding LED. According to the instructions, in order to avoid damage to the microcircuit, you should not exceed the 20 mA limit for the current supplied to the LEDs.
Assembling the sound signal indicator
We check the availability and ratings of parts.
Resistances: R1, R5 R8 – 1 kOhm; R2 – 100 Ohm; R3 – 10 kOhm; R4 – 50 kOhm, any trimmer; R6 – 2.2 kOhm (560 Ohm); R7 – 10 Ohm; R9 – 20 kOhm. Capacitors C1, C2 – 0.1 µF. We decipher resistor values by color code. Look at the photo.
To assemble the circuit you will need a low-power soldering iron, soldering flux, solder and side cutters. The assembly sequence may be different.
- We install the resistors on the board according to the nominal value and solder them, and also, according to the key drawn on the board, we install and solder the bed for the microcircuit.
- Similarly, we solder a variable resistor, capacitors, and connection sockets.
Option 2 for installing LEDs on the level indicator board on LM3915
- We check the correct assembly and soldering, and correct errors if necessary.
- We insert the microcircuit into the crib using the key drawn on the board.
- We supply 12 Volts from the power supply.
- We send a signal from the telephone output of any gadget. If all parts are installed correctly and are in good working order, the circuit will work. Watch the video. The audio signal level at the input is set by trimming resistor R4. Watch the video.
Placing the LM3915 chip on the crib comes in handy. The microcircuit has relatives LM3914 and LM3916 with linear and stretched scales. The microcircuits are absolutely identical in pinouts. Therefore, on the basis of this circuit, you can easily assemble a voltage, power indicator, or an indicator for monitoring any parameter.
A set of parts for assembling an LED audio signal level indicator on the LM3915 can be purchased from the following link http://ali.pub/2z6xyo . If you want to seriously practice soldering simple structures, the Master recommends purchasing a set of 9 sets, which will greatly save your shipping costs. Here is the link to purchase http://ali.pub/2bkb42 . The master collected all the sets and they started working.
Success and growth of skills in soldering.
An LED signal level indicator simulating a dial indicator is not a new idea, and it would seem that what new can be invented here? Well, in this regard, I did not invent anything.. I even find it difficult to indicate the original source. The goal is different: to make a simple circuit using available elements. The circuit doesn't even include the ubiquitous microcontrollers. Moreover, it’s not easy to solder the board, but to make a complete structure that can be installed in the amplifier without damage appearance. And also, based on this circuit, make your own version of the indicator, taking into account your skills in electronics, or, for example, color music. For this purpose, the indicator is made on two boards: an LED control board and an indication board. In this article, I propose 3 indicator options, let’s call them “arrow”, “6E1P lamp” and “arc”. There are also 2 options for scale illumination (A and B). And all this can be done on 5mm, 3mm or SMD 0805 LEDs. Like any other, this circuit has its advantages and disadvantages. Advantage: cheap element base, with high interchangeability, tolerances, relatively simple circuit. Display options, as they say, for every taste. Disadvantages: selection of many elements, otherwise you would have to stick to one type of LEDs. Small dynamic range, i.e. on a powerful amplifier at low volume the indicator will be “silent”. Visual bifurcation of the “arrow”, which is caused by smooth switching of the LM3915 comparators in the “dot” mode. Eliminating this phenomenon is possible, but requires more complexity in the circuit. High density and thin thickness of tracks on the board. The solution is to buy ready-made boards, but I did it myself using photoresist.
The scheme works as follows. The input signal is supplied to VT1. The input signal level is controlled by R1. After amplification and rectification, the input signal is fed to the input of LM3915. LEDs (1 line) are directly connected to the MS outputs. Through transistor switches on VT2-VT11 there are additional 6 lines of LEDs. Transistor switches are used because The thermal resistance of the MS case is 55 °C/W, which allows a maximum power of 1365 mW at temperature environment 25 °C. However, we won’t delve into the boring world of numbers, I’ll just say that no more than 2 LEDs can be connected to each output of the LM3915. Otherwise the MS will overheat. The S1 button switches between the “column” and “dot” display modes. Button S2 turns on additional lines of LEDs, which makes it possible to implement 2 more operating modes of the indicator. As can be seen from the diagram, many elements (R and C) need to be selected. This can be attributed to the scheme's disadvantage and advantage. The selection allows you to use any LEDs without being tied to Vsupply. 12V and adjust the brightness of the indicator LEDs and backlight to your taste. R6 ensures that the “arrow” glows at “zero” in the absence of an input signal. As a rule, selecting R6 is not required when powering the circuit with 12V. If the “arrow” at “zero” is not needed, then we do not install R6. By selecting R7, we set the required brightness of the LEDs connected directly to LM3915 according to the scheme HL7, 14, 21, 26, 35, 42, 49, 56, 63, 70. The smaller R7, the greater the current through the LEDs, the minimum permissible value of R7 is 20 kOhm . Resistor R8 adjusts the brightness of the backlight LEDs. R8 power is at least 1W. Using resistors R9-R18 we adjust the brightness of the remaining LEDs. Approximately 10 kOhm for LEDs with a luminous intensity of 1000 mcd, 1 kOhm for LEDs with a luminous intensity of 200-300 mcd. Capacitor C3 can be used to regulate the inertia of the “arrow”. The device is powered from a stabilized voltage source of 12V with a current of 0.2-0.3A for the mono version. The supply voltage can be increased to 18V.


External design and differences between indicator options. External design is described in the video report. I will add that when selecting the current of the LEDs, you need to achieve a balanced glow of the indicator and backlight. Then the indicator will look beautiful. The illumination of option “A” looks more beautiful than “B”, but is more difficult to manufacture. Find the stencil for the indicator in the LAY file with the board. There is no need to “mirror” boards and stencils when printing. Mount the indicator in the amplifier in any convenient way, behind the front panel window. Do not place near very hot elements. You can slightly tint the front panel glass to hide possible minor defects external design. The indicator input is connected in parallel to the output of the volume control or the input of the final amplifier. The setting consists of setting the tuning resistor R1 of the “arrow” of the indicator to +3db at the rated power of the amplifier.

Please note that the sizes of the indicator boards are different and the size of the board is significantly larger than the working window of the indicator. On the “Arc” indicator, the number of yellow and red LEDs used is 26 pcs. for stereo option. This is not reflected in the diagram, but assembly and adjustment are no different. Also, the backlight in various versions uses from 3 to 10 LEDs (see LAY). This is also not reflected in the diagram to avoid confusion.
List of radioelements
| Designation | Type | Denomination | Quantity | Note | Shop | My notepad |
|---|---|---|---|---|---|---|
| U1 | LED driver | LM3915 | 1 | To notepad | ||
| VT1 | Bipolar transistor | KT315A | 1 | To notepad | ||
| VT2-VT11 | Bipolar transistor | KT361B | 10 | Any PNP | To notepad | |
| VD1, VD2 | Diode | KD522A | 2 | 1N4148, any pulse | To notepad | |
| HL1-HL6 | Light-emitting diode | DFL-3014BD-1 | 6 | blue | To notepad | |
| HL7-HL62 | Light-emitting diode | DFL-3014GD-1 | 56 | green | To notepad | |
| HL63-69 | Light-emitting diode | DFL-3014YD-1 | 7 | yellow | To notepad | |
| HL70-HL76 | Light-emitting diode | DFL-3014RD-1 | 7 | red | To notepad | |
| C1-C3 | Capacitor | 1 µF | 3 | To notepad | ||
| R1 | Trimmer resistor | 50 kOhm | 1 | To notepad | ||
| R2 | Resistor | 220 kOhm | 1 | To notepad | ||
| R3 | Resistor | 3 kOhm | 1 | To notepad | ||
| R4 | Resistor | 10 kOhm | 1 |
UMZCHs look beautiful and stylish, just where to find them... There is a way out - we will make a meter in which the role of the arrow will be played by light-emitting diodes controlled by a microcircuit. LM3916- This is a special chip for LED level indicators.
Diagram of an LED indicator

The LEDs are connected via connectors J3 - J12 (only one row of LEDs is shown in the diagram). The indicator circuit will require a bipolar power supply for proper operation. The positive supply potential of the LED strips should be below +25 V and, in combination with the negative voltage, should not exceed 36 V. The minimum voltage level depends on the operating voltage of the LEDs. For example, if the LED is 1.9V, and we have 7 LEDs per pin, then the minimum positive voltage will be 7 x 1.9V + 1.5V (voltage drop across the LM3916) = 14.8 volts. Green LEDs tend to have a slightly higher voltage of 2.2-2.4V, so +18V will be sufficient in most cases.

The LED current is determined by resistor R1_REF, and with a resistance of 2.2 kOhm there will be 5 mA.
Formula for calculation: Iled = 10 x (1.2 V / R1_REF)

You can use TL072, TL082, LM358 as a dual operational amplifier at the input. The output mode can be set by 3-pin jumper JP1. The maximum input voltage for LM3916 is 1.2V, and R8-R7 can be used to adjust the input level.
Video of the indicator
LED color of your choice. Used here green LEDs for negative levels, yellow- 0dB and red for positive audio signal level. For this you need rectangular LEDs. An archive with drawings of printed circuit boards is available.
When making my amplifier, I firmly decided to make an 8-10 cell LED output power indicator for each channel (4 channels). There are plenty of schemes of such indicators, you just need to choose according to your parameters. On this moment The choice of chips on which you can assemble an ULF output power indicator is very large, for example: KA2283, LB1412, LM3915, etc. What could be simpler than buying such a chip and assembling an indicator circuit) At one time I took a slightly different route...
Preface
To make output power indicators for my ULF, I chose a transistor circuit. You may ask: why not on microcircuits? - I will try to explain the pros and cons.
One of the advantages is that by assembling on transistors, you can debug the indicator circuit with maximum flexibility to the parameters you need, set the desired display range and smoothness of response as you like, the number of indication cells - at least a hundred, as long as you have enough patience to adjust them.
You can also use any supply voltage (within reason), it is very difficult to burn such a circuit, and if one cell malfunctions, you can quickly fix everything. Of the minuses, I would like to note that you will have to spend a lot of time adjusting this circuit to your tastes. Whether to do it on a microcircuit or transistors is up to you, based on your capabilities and needs.
We assemble output power indicators using the most common and cheap KT315 transistors. I think every radio amateur has come across these miniature colored radio components at least once in his life; many have them lying around in packs of several hundred and idle.
![]()
Rice. 1. Transistors KT315, KT361
The scale of my ULF will be logarithmic, based on the fact that the maximum output power will be about 100 Watts. If you make a linear one, then at 5 Watts nothing will even glow, or you will have to make a scale of 100 cells. For powerful ULFs, it is necessary that there be a logarithmic relationship between the output power of the amplifier and the number of luminous cells.
Schematic diagram
The circuit is outrageously simple and consists of identical cells, each of which is configured to indicate the desired voltage level at the ULF output. Here is a diagram for 5 indication cells:

Rice. 2. Circuit diagram of the ULF output power indicator using KT315 transistors and LEDs
Above is a circuit for 5 display cells; by cloning the cells you can get a circuit for 10 cells, which is exactly what I assembled for my ULF:

Rice. 3. Diagram of the ULF output power indicator for 10 cells (click to enlarge)
The ratings of the parts in this circuit are designed for a supply voltage of about 12 Volts, not counting the Rx resistors - which need to be selected.
I’ll tell you how the circuit works, everything is very simple: the signal from the output of the low-frequency amplifier goes to the resistor Rin, after which we cut off a half-wave with diode D6 and then apply a constant voltage to the input of each cell. The indication cell is a threshold key device that lights up the LED when a certain level at the input is reached.
Capacitor C1 is needed so that, even with a very large signal amplitude, the smooth switching off of the cells is maintained, and capacitor C2 delays the lighting of the last LED for a certain fraction of a second to show that the maximum signal level - peak - has been reached. The first LED indicates the beginning of the scale and is therefore constantly lit.
Parts and installation
Now about the radio components: select capacitors C1 and C2 to your liking, I took each 22 μF at 63 V (I don’t recommend taking it for a lower voltage for ULF with an output of 100 Watt), the resistors are all MLT-0.25 or 0.125. All transistors are KT315, preferably with the letter B. LEDs are any that you can get.

Rice. 4. Printed circuit board for ULF output power indicator for 10 cells (click to enlarge)

Rice. 5. Location of components on the printed circuit board of the ULF output power indicator
I didn’t mark all the components on the printed circuit board because the cells are identical and you can figure out what to solder and where without much effort.
As a result of my labors, four miniature scarves were obtained:

Rice. 6. Ready-made 4 indication channels for ULF with a power of 100 Watts per channel.
Settings
First, let's adjust the brightness of the LEDs. We determine what resistor resistance we need to achieve the desired brightness of the LEDs. We connect a 1-6 kOhm variable resistor in series to the LED and supply this power chain with the voltage from which the entire circuit will be powered, for me - 12V.
We twist the variable and achieve a confident and beautiful glow. We turn off everything and measure the resistance of the variable with a tester, here are the values for R19, R2, R4, R6, R8... This method is experimental, you can also look in the reference book for the maximum forward current of the LED and calculate the resistance using Ohm's law.
The longest and most important stage of setup is setting the indication thresholds for each cell! We will configure each cell by selecting the Rx resistance for it. Since I will have 4 such circuits of 10 cells each, we will first debug this circuit for one channel, and it will be very easy to configure others based on it, using the latter as a standard.
Instead of Rx in the first cell, we put a variable resistor of 68-33k in place and connect the structure to an amplifier (preferably to some stationary, factory one with its own scale), apply voltage to the circuit and turn on the music so that it can be heard, but at a low volume. Using a variable resistor, we achieve a beautiful wink of the LED, after that we turn off the power to the circuit and measure the resistance of the variable, solder a constant resistor Rx into the first cell instead.
Now we go to the last cell and do the same thing only by driving the amplifier to the maximum limit.
Attention!!! If you have very “friendly” neighbors, then you can not use speaker systems, but get by with a 4-8 Ohm resistor connected instead of the speaker system, although the pleasure of setting it up will not be the same))
Using a variable resistor, we achieve a confident glow of the LED in the last cell. All other cells, except the first and last (we have already configured them), you configure as you like, by eye, while marking the power value for each cell on the amplifier indicator. Setting up and calibrating the scale is up to you)
Having debugged the circuit for one channel (10 cells) and soldered the second one, you will also have to select resistors, since each transistor has its own gain. But you don’t need any amplifier anymore and the neighbors will get a small timeout - we simply solder the inputs of two circuits and supply voltage there, for example from a power supply, and select the Rx resistances to achieve symmetry in the glow of the indicator cells.
Conclusion
That's all I wanted to tell you about making ULF output power indicators using LEDs and cheap KT315 transistors. Write your opinions and notes in the comments...
UPD: Yuri Glushnev sent his printed circuit board in SprintLayout format - Download.

We also recommend
 The holiday has not yet received official status in Russia
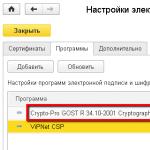 Publications Operations with electronic documents
 Household appliance recycling program in Eldorado
 Recommendations for organizing and conducting radiation monitoring
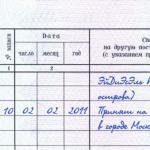 Part-time work Order on transfer to part-time work week
 Is the translator paid for travel time?