How to make a travel book from a notebook. Travel book: collecting travel impressions. What is Travel book
A travel book is not just an album, but an album-notebook that you can take with you on a trip. And as events unfold, write down your impressions, paste in tickets, postcards, sketch pictures, and then print and paste your photos there. This is how your memories will be captured at their peak. You must admit that when you come back from a trip, the impressions fade a little over time. And it’s very interesting to get it, for example, a year after the trip and remember once again how it was.


So, the main thing in a travel book is its practicality. After all, he takes it with him on trips! Therefore, it should be quite flat, light and convenient in format. It is best to make it on rings, so that later you can add photo clippings, cards and other interesting things, but, in principle, you can make it on a spring.


The maximum size of travel beech is 20x15 cm. It may be smaller: 13x18 cm or 13x20 cm. Then it’s a matter of taste and proportions.
Please note: immediately try not to select heavy jewelry for it, therefore, a minimum of metal.
What will you need to create a travel book? In my case it's:
Teresa Collins Stickers;
Some craft paper;
Regular office paper.
Let's start preparing!
To begin with, I’ll tell you that out of 6 sheets of paper, 4 pcs. I chose with a cyclic (repeating) pattern and 2 pcs. with the ability to cut cards and various elements from it.
So, first we will prepare 4 sheets measuring 13x20 cm, and one sheet measuring 20x18 cm to make a pocket later.
We will cut white office sheets the same size - 13x20 cm, as the main travel sheets.

The second stage of preparation is cards and decorations. When choosing travel paper, immediately make sure that there are sheets from which you can cut out all these elements - after all, these are the most budget-friendly decorations. But if you are lazy, then you can take ready-made die-cuts, but not chipboard, because it will add volume unnecessary for travel beech.

The third stage of preparation is to find stamps suitable for the theme. These can be frames, inscriptions, and pictures corresponding to the theme and style of your travel book.
We stamp and then cut out the resulting pictures - here are another homemade die-cuts, which, thanks to the ink, will add texture to the work.

Well, from ready-made items, I suggest taking text stickers and cookie bags, which will serve as excellent pockets.
In general, I am in favor of most decorations being flat and light, which is why I offer just such options.

Preparation is the most important thing. In fact, you can assemble our blanks into rings and it will be very simple, and yet the beech has already been made.
And we won’t stop there and will bring it to mind!
First we will make a side pocket - take a sheet that is slightly larger than the rest and bend it to make a 13x20 cm page and a fold.

We glue the edges of the pocket at the top and bottom, or just fasten it with a stapler as I did. Decorate the pocket with stamping or other decor.
The pocket is ready!

For one spread, we take two blanks from scrap paper, one of which we will leave empty, because there will be photographs, and the second we will decorate a little to our taste.

This way, we can prepare and decorate all the remaining sheets (half will be decorated, and half will be left empty for photos) and some craft ones.
I ended up with 4 spreads.
You can decorate the pocket from a cookie bag, or you can leave it as is.
Let's start with the cover - it should also be flat and comfortable! Sometimes I don’t even decorate it if the paper doesn’t allow for it and I want a completely flat cover. This time I made a simple composition from a piece of ribbon, a metal frame and a cutout. First I tried on the composition.

The cover is ready.

On the back of the cover, first rub the seams a little with the back of the scissors to smooth them out, and then cover the page with scraps of paper.

You can place some card on top, but this is optional. It turned out like this.

When almost all the elements are ready, we look through the finished pages again and add some details, stickers or stamps.

Then we lay out all the pages on one surface and try to choose the best combinations of spreads.

Arrange it in the right order.
This is the first reversal.

Don't forget to add white office sheets to the travel book.
This is how my second spread turned out.

The third spread is contrasting.

The fourth spread has a pocket (made from a cookie bag).

The next spread is with a vertical pocket, which we made at the preparation stage.

Spread with a page for photography.


Don’t forget to decorate the back cover either: you can, for example, add a handwritten inscription or a Hand made stamp.

All that remains is to put all the pages of the travel book on rings. Then we carefully make holes with cropodile and assemble the travel beech together.


A small and useful detail: a paperclip with a brush that can serve as a bookmark.

Our travel book is ready! As you understand, these are instructions for creating it: format, necessary decorations and assembly.
There are a great many options for decorating travel beech: start from the country you are going to travel to, from your favorite colors, from the materials that are available, from the style of the trip (sea trip, road trip, visiting trip) and fantasize, imagine your future trip. What will it be like? What are you going to visit on your trip? What kind of entertainment will there be? And you won’t notice how your travel book will acquire individuality and the required number of pages, pockets and tags.
I hope that my master class will help you create your travel book for an unforgettable trip. Travel, record, collect impressions and share them with friends!
Get 200 ₽ on your first order!
Ksenia Lex, author of the DIY moms project, believes that making a travel book can be a useful educational activity for a child. What exactly is this and how to make it, read the instructions written specifically for.
What is Travel book
Travel book is a book about travel, made with your own hands. It can be issued both during the trip and upon arrival home. Don't forget to save photos and memorabilia that remind you of visiting interesting places.
The most important thing is that the Travel book will preserve your vivid memories and impressions of the trip. Therefore, I recommend not to put off creating a travel book, but to make it together with your child without delay. Perhaps this will become a new exciting family tradition for you!
In addition to the fact that you will have a unique album with photographs and memories of the trip, for the child the creation process will bring developmental benefits and pleasant time spent with parents.

Why Travel book is useful for children
- develops memory and thinking;
- trains fine motor skills;
- develops skills in working with scissors and glue;
- vocabulary and horizons expand;
- develops perseverance and attention to detail;
- develops imagination and creativity;
- teaches new drawing and appliqué techniques.
How to make a Travel Book with your own hands

To create one travel book you will need:
- your travel photos
- glue, glue gun or double-sided tape;
- felt-tip pens, markers, pencils;
- children's stickers, magazine clippings for decoration;
- any suitable decor (glue with glitter, colored decorative tape, etc.);
- regular and curly scissors;
- colored paper or cardboard;
- a ring notebook with thick pages (we used a sketchbook);
- magnets from the trip.
STEP No. 1. PREPARE PHOTO

You can print small-format photographs using photo printing. But if you have a color printer at home, just copy all the photos into Word and select the desired size.
All that remains is to print (on regular or special photo paper) and cut out. For example, for the cover of our album we chose a family photo that a photographer took for us at the Dinosaur Park, and for the pages we chose small photographs printed on a printer.
If your child is already good with scissors, you can trust him to cut out pictures on his own. Even if something doesn’t work out the first time, you can print it out and redo it.
STEP No. 2. SELECT DECOR

Stickers are just perfect for decorating a scrapbook you make with your child. It’s easy for children’s fingers to glue them onto the pages, and the album will look neat and beautiful. Plus, with this creative activity, children develop fine motor skills.
Since we were making an album dedicated to our trip to the dolphinarium, oceanarium and dinosaur park, I chose stickers based on the theme. A great reason to remember the names of the inhabitants of the seas and dinosaurs!
STEP #3. PREPARE THE COVER

From every trip, we bring magnets as souvenirs. But we don’t decorate the refrigerator with them, we find new creative and educational uses for them.
IN in this case The magnet from Dzhubga became the decoration of the cover of our album. To design the cover we needed a glue gun - we glued a magnet onto it.
Next, use curly scissors to cut out a frame for the photo from white cardboard. Glue the photo and frame onto the album cover using glue or double-sided tape. Decorate with children's stickers with dinosaur footprints. Ready!
STEP No. 4. DECORATING THE ALBUM PAGES

Now all that remains is to think through the design of each page of the album. This is a creative endeavor and will take time. For several days, Andrew and I pasted photographs, remembering best moments from the trip, names of cities and attractions, drew, cut and decorated our travel book!
Travel book page layout

You need to arrange photographs and decorations on the page so that there is enough space for inscriptions and text. You can add tickets from the trip, some memorabilia: dried flowers, coins, small shells, booklets, beautiful napkins from a cafe, business cards, receipts, postcards or stickers. The main thing is that objects should be as flat as possible so that the book closes well.
Now, let’s sign each page of the album and decorate it! On this page (pictured above) Andrew pasted up pictures of sea animals and decided that he needed to decorate them with blue glitter that resembled the sea.
This is how you can easily turn one and popular ideas for travelers to educational activities for children. I hope our idea is useful to you. We wish you pleasant creativity, dear travelers!
Hello!
Today we will talk about travel, trips, visiting new places, as well as creativity.
All that is revealed to the traveler on his trip are unforgettable moments that very often want to prolong, stop and later return to them again.
It doesn’t matter how far from home you are going to go, maybe even visit a neighboring city. The main thing is to treat your journey as an unforgettable new adventure!
And to better capture our adventure, today we’ll talk about Travel Books.
What is a Travel Book?book) and what is it for?
Travel book ( travel book from English travel- journey, book- book) or simply a book of traveler’s notes is an old way of recording your thoughts, experienced emotions and impressions right on the road. The notes made during a trip in a travel notebook (as it was called in the old days) allowed some people to create fascinating books about unforgettable places, and others to comprehend life positions and priorities.
With the advent and development of photography, notebooks began to be filled not only with notes, sketches of landscapes, memorable little things from the trip (postcards, mini souvenirs, postage stamps and envelopes, brochures, maps of places visited, mini travel guides), but also with photo cards, photo collages and instant pictures.
Currently, when making travel books, people use not only improvised means (memorabilia of the traveler, clippings, tickets, etc.), but also use techniques and special materials, presented in a wide range on the modern market of hobby goods.
All kinds of paper with thematic designs; special stickers and cards; background stamps; metal, plaster, plastic and paper decorations - all this allows you to turn a travel notebook from a simple travel report into a unique designer art object. And the archival quality of these special materials makes it possible to preserve such works for many, many years, and even pass them on to inheritance.
What is the main feature of such works, you ask?
It's very simple: this type of creativity does not obey any rules. The production of a travel book depends on your taste and flight of fancy; it is characterized by a free form of recording incidents and an informal organization of records.

Where to begin? What will you need?
1. Start by choosing the basis of your book.
A book with thick crusts and sheets of thick, unlined paper is best suited. The best form of fastening sheets, which allows you to increase the volume of a book and add pages to it, is a spring or rings. To ensure the safety of the filling, you need to take care of the intercepting rubber band.
Such books can be found in bookstores, art stores, specialized scrapbooking stores, or you can make them yourself. Thick sheets of paper will allow you not only to use a ballpoint pen for taking notes, but also felt-tip pens for sketching. The purpose of such notebooks is: for “sketches” (sketches) and pastel drawing, for scrapbooking, photo album, guest book, diary, etc.
2. Prepare in advance the main tools for work.
You will need a universal glue stick (suitable for gluing photographs), a roll of double-sided adhesive tape, small scissors, felt-tip pens, and a ballpoint pen. This is enough to attach and outline the main elements while traveling. You will carry out the check and final fixation (including machine stitching) upon returning home.

3. Stock up on materials to decorate your unique entries.
Paper with a travel-themed design, small-sized colored cardboard (or its scraps), funny stickers, cut-outs of different shapes and colors, envelopes and pockets - all this will make your work unique. And multi-colored tape and decorative paper clips of interesting shapes will help not only add zest, but also give the opportunity additional method fastening elements.
Don't forget that all decorations should be as flat as possible!

For example, Well Traveled thematic paper 15 by 15 cm, specially created by manufacturers, is perfect, as well as a set with 30*30 cm Well Traveled stickers (stickers) and cards 10 by 15 cm.
What are the best basic techniques to use when creating a traveler's book?
1. First of all, take photos!
Take pictures of what you especially notice! Take pictures of what others don't pay attention to!
Don't worry about having too many photos to fit into your travel journal. Upon returning home, you can always make collages from many thematic photographs or simply print them in small size, or even in a very small one! Looking at them under a magnifying glass will be even more interesting!!!
Stock up on extra batteries for your camera and take a charger on the road.
Do not under any circumstances miss the machine (booth) with instant photos; you can get quick and very creative photos there as a keepsake.
If for some reason you were unable to photograph the miracle of nature or architecture you saw, do not be discouraged; other travelers will be happy to share their photographs with you, you just have to search the Internet.

2. Write notes on the pages.
During lunch breaks, on an airplane, on a train, while waiting for an order in a restaurant, in any convenient case when you have a minute of free time, try to write down your experienced emotions. If you take a photo of your posts, be sure to leave a space for it on this page.

3. Draw on the pages of your journal.
Even if you don't know how to draw, try it. Travel gives so much inspiration that even funny “doodles” in the fields will remind you of joyful moments.
By the way, there is a specific name for such drawings - doodling(English doodle - doodle) is a simple drawing made casually, which can have a specific plot, or simply be an abstract picture.


Thematic stamps are an excellent option for replacing drawings.
4. Don't forget to write headings.
Page titles will allow you to not miss anything and attach relevant photos. An excellent solution for accurate execution of headings would be to use stamps (prepare sets of individual letters that can be easily cut out and then folded into the desired words); sticker letters and rubs are also convenient. Or you can simply write the title by hand.

How to make your travel book unique?
Take the time to look for something special for your book. Collect "artifacts"!!!


2. Do not throw away tickets, boarding passes, hotel reservations and event passes. If you can’t apply them to your album right away, don’t worry, save them until you return home. At home, it is easier to select what you need and carefully place it in an envelope or pocket, which can be placed inside or glued to the last page of your travel book. But do not forget that many receipts and tickets are printed on paper that is not of archival quality, which means they can fade, tear or deteriorate, but this is not a problem: when you arrive home, laminate or copy such “artifacts” and place them in your diary.


3. Save beautiful napkins and funny sugar mini-packages from cafes and restaurants you visit - they will serve as an excellent frame for the corresponding photo. And the receipt with the listed dishes will once again make you remember the delights of local cuisine.

4. Visit your local post office and purchase postcards, envelopes and stamps. Take a photo at your local mailbox or post office. Well, if you manage to send a letter home from there, then you simply won’t find a better “fellow traveler” for your unique album.

What is the result?
As a result, when the trip is over: all the treasures have been found, the main attractions have been visited, the most delicious local products have been tasted, and the memory in the camera has long been at zero, do not forget, as carefully as possible, to put the unique creation you created in your luggage - your future paper adventure, which will again immerse you in those happy moments of life that this trip gave you.
Upon returning home, sort and print the photos, add them to your book, design the cover and store your travels along with the emotions you lived not only in your memory, but also in carefully packaged material pieces of memories, collected bit by bit into one big kaleidoscope of wanderings.
Never be afraid to try new things, I’m sure you will succeed!
Good luck, dear travelers!
Did you like the master class? Save it for yourself:
Other master classes on scrapbooking
 .
.
 .
.
The master class was conducted by Anna Semenova.
Summer is a wonderful time to travel. A necessary attribute of exciting travels is a travel book. In it you can save all the pleasant little things that will later remind you of a good time.
Materials:
thick cardboard;
textile;
padding polyester;
x/6 fabric for spine;
decorations - to taste.
Tools:
glue “Moment Crystal”;
stamps.
Book size - 15 x 21 cm (7 spreads).
How to make a travel book.
We cut 8 pages and 2 covers from beer cardboard - 10 rectangles 15x21 cm. For binding from x/6 fabric, cut 7 strips 21 cm long and about 3 cm wide. 1
1
Assembling the binding. Glue the two pages together using a strip of fabric.
 2
2
Glue the pages and strips of fabric together one by one. We bend the glued pages into a “ladder” so that nothing moves anywhere. In total, we glue together 8 pages of beer cardboard (there are two more left - this is for the cover).
 3
3
We secure the binding with braid, which also adds aesthetics to the spine.
 4
4
From thick paper cut out a spine measuring 21 cm. We measure the thickness according to the width of the binding plus 3 cm for gluing. It turned out to be 9 cm.
 5
5
We glue the spine to the covers.
 6
6
Cover with padding polyester. It is enough just to “grab” it a little with glue so that it does not move out. You don't need a lot of glue, because it can then be felt through the cover in unpleasant lumps.
 7
7
We cover the cover with fabric and form the corners.
 8
8
Install the magnetic button.
 9
9
We sew a strap for the fastener and attach it to the back cover.
 10
10
We design the front cover. We apply a design to wooden mugs using embossing powder. The most important thing is to decorate the cover with wear-resistant parts: brade, wooden chipboard, cord, metal decorations.
 11
11
For the inside of the album we decorate paper envelopes. Glue it into a travel book.
 12
12
We sew pockets from tracing paper onto some pages. You can put small guidebooks, metro maps, beautiful theater tickets in them.
 13
13
We decorate all the pages of the album to our liking. Don't forget to make several photo backgrounds.
 14
14
Glue the inside of the album into the cover. We do not glue the spine to the binding!
 15
15
By the way.
The travel book should have a lot of pockets and envelopes so that everything fits. It’s also a good idea to provide places for photographs.
It is better to take the fabric for the top with a small, dim pattern, then you can design the cover in any style. And it’s better that the fabric is dense and non-staining, you remember: the travel book is about to travel.
Adviсe.
You can use paper strips instead of fabric, but fabric is more durable in this case. It should be remembered that the book must survive the flight and numerous trips to various places of interest.
You can make the background for the pages yourself or use ready-made scrap paper.

Decor.
- The pages of a travel book can be white, multi-colored, and they can also be aged. To do this, place the watercolor paper in the oven and watch the process of browning.
Leave room for travel notes - a sort of “living” story during the trip, in which you will share your impressions. Also mark interesting information about the place where you are: historical information, urban structure, etc. d.
Make the pages themed. For example, dedicated to food (write down a recipe for a local dish, post a photo of your favorite dessert), active recreation (post photos of excursions, trips to interesting places, your triumphal ascents, etc.), the beach (sunsets, sea, sand may the bliss remain with you for a long time). Think about what else you remember? Maybe the color of the local people or nature - all this will make your travel book truly fascinating.
Creating a travel journal is a new trend among avid tourists. So what is it and how to make a travel book with your own hands?Previously, it was fashionable to store memories in beautiful albums. The footage taken on vacation was carefully sorted out, the best of them were printed out, inserted into plastic envelopes and... thrown onto the far shelf of the bookcase. As practice has shown, impressive volumes with photographs were taken out only on rare occasions, in order to show them to friends who did not have time to escape.
With coming digital technologies from translating important images to paper carrier began to refuse. Nowadays, most people store their files on their computer's hard drive. However, this approach deprived the memories of the soul and turned them into standard jpeg pictures.
Gradually, the tradition of travel documentation is being revived. After their arrival, millions of happy vacationers begin creating travel books or travel journals. They are a uniquely designed hodgepodge of photographs, candy wrappers and cute little things brought from the tour.
What does a travel journal include?
1. Postcards
In almost every city you can find sets of postcards for tourists. They depict local landmarks or natural beauty. You can also include postcards received abroad from relatives.2. Tickets
The main advantage of tickets is that they fix a specific date and time. Inevitably, our memory begins to fail us; in a few years it will be difficult to remember when this or that photograph was taken. Looking at the ticket, you will know for sure that on September 18, 2016 you flew to the Netherlands, and on the 20th you visited the Vincent Van Gogh Museum in Amsterdam.
3. Business cards
On this moment The printing industry is booming. Some business cards can easily be compared to works of art. I love collecting cards of boutiques, cafes, taxis and other useful organizations. Who knows, maybe I’ll decide to permanently move to city N, and the number of the Pizza Home Delivery company will come in handy.
4. Diary entries
Impressions are only good when they are fresh. I spoke in rhyme. It is difficult to describe the delight 10 days after the amazing event. Be sure to fill out several pages in the evenings personal diary. Re-reading the entries, you will again plunge into a whirlpool of positive emotions.
5. Photos
Probably, for this point, comments will be unnecessary. You can look at a professional photo endlessly Egyptian pyramids, but not a single picture can replace the unclear photo in which you stand in front of the tombs of the pharaohs.
6. Maps
Maps add an element of concreteness to your memories. You have the right to use topography as an auxiliary design element of the travel book, or to focus attention on the route. Often a map with key points of the trip is pasted onto the first page of a travel journal and acts as a table of contents. The remaining pages of the notebook are devoted to a description of each location.
7. Autographs and wishes
Often on trips we get acquainted with interesting people and find new friends. Sometimes, completely unexpectedly, you can meet a celebrity and get an autograph. Sincere wishes from your new friends will take pride of place in your travel book.
8. Labels and wrappers
Every country has unusual foods. After every trip, handfuls of candy wrappers are found in my pockets. If the label is clean and has an original design, then why not paste it into the magazine. It will be another reminder of the food adventures experienced abroad.
9. Paper for scrapbooking
I love decorating my creations with patterns and textures. Office supply stores and art stores sell scrapbooking paper. It will give your magazine an individual atmosphere and emphasize the significance of its content. For each specific place, you can select the appropriate sheet of colored paper.
10. Brochures
Looking at travel brochures inspires us to travel. Sometimes one “handout” is enough to tear a person away from his home. If your journey began with an advertisement, then under no circumstances throw away such an important document.During the trip itself, you will come across brochures more than once. In museums and on excursions, you can collect handouts for free to later include them in your notebook of memories.

11. Stickers and stickers
Use funny self-adhesive faces and arrows to add accents. Without their participation, the magazine risks turning into a boring official report. I like the comic style of displaying information, when photographs of people are mixed with frames of thoughts, statements, or combined with cartoon characters.
Let's start making a travel book
For creativity you will need
- hardcover spiral notebook;
- glue stick;
- regular pencil for drawing;
- scissors;
- satin ribbons;
- scraps of beautiful fabric;
- colored pens or markers.
We also recommend
 Basic logistics tools Characteristics of logistics functions
 Technical specifications (TU) for frozen berries
 Calculation of the amount of gaseous and liquid argon
 Features of improvement of industrial enterprises Greening of industrial areas
 The history of the creation of National Geographic magazine: the era in pictures
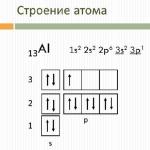 What is the practical significance of aluminum?